

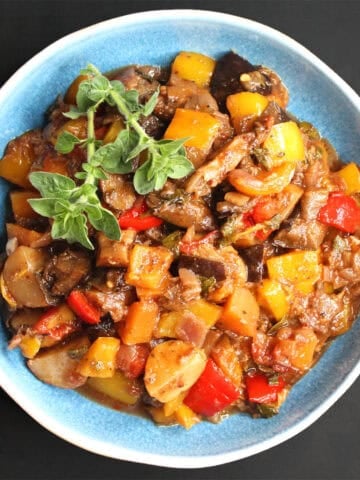
Make this mouthwatering vegan white bean chili loaded with healthy protein for a hearty, comforting dinner. The chili is creamy and thick, with smoky flavor from cumin, rosemary, oregano and spicy jalapeno peppers. Watch the accompanying video for step-by-step instructions.

This vegan white bean chili is lip-smackingly delicious. It's smoky with cumin and jalapeno and rosemary, creamy with potatoes and a smidge of cashew cream, and hearty and comforting as can be.
White beans, like cannellini beans, great northern beans and navy beans, which you can use interchangeably in this recipe, are super versatile. Their neutral flavor makes them a great addition to so many delicious recipes, including vegan pasta e fagioli, garlicky white bean soup, and this vegan Tuscan white bean stew.
Stir them into a pot of this delicious vegan white bean chili and serve it with a chunk of crusty French bread or Italian bread. It's a dinner to love.
Table of Contents
Why you will love this recipe
- Comfort food. Chili recipes, like this vegan Irish chili and this Instant Pot chili, are wonderful as the weather cools down, and this white bean chili is a nice change. It's just as hearty and soothing and full of amazing flavors.
- Easy recipe with pantry ingredients. This recipe is very easy to make any time of year, but particularly in winter when one tends to rely more on pantry staples. Besides the white beans, all you will need are a few dried herbs, onions, garlic and frozen corn.
- Perfect for meal prep. This white bean chili is great for meal prep. Store leftovers in the fridge or make a large batch and freeze some for another day!
- Soy-free, gluten-free, diary-free and can be nut-free. You can use pumpkin seeds instead of raw cashews in this recipe if nut-free.

Ingredients
- White beans. You can use any white beans, canned or dried, including cannellini beans, navy beans and great northern beans. If using dried beans cook until they are tender.
- Extra virgin olive oil. You can use another oil, like avocado oil instead.
- Herbs: garlic, jalapeno peppers, fresh cilantro (coriander), dried rosemary and dried oregano. This combination of herbs adds amazing smoky flavor. You can use sage or marjoram instead. The fresh cilantro adds a pop of fresh, lemony flavor.
- Spices: Ground cumin and optional adobo seasoning. Ground cumin has a lovely, earthy and smoky flavor that's wonderful in foods with a Tex-Mex flair, like this vegan white chili. The adobo seasoning adds even more flavor, but you can skip it if you don't want to use it.
- White onion or yellow onion
- Frozen corn kernels. The corn adds nice texture to the chili, as well as some sweetness.
- Potatoes. Yellow or red potatoes are both fine. Don't use starchy, floury potatoes like russet potatoes.
- Raw cashews or pumpkin seeds. These are blended into a cream that will make the white bean chili even more creamy and delicious.
- Lemon juice or lime juice. Stir this in before serving for a lovely, fresh flavor.
Watch how to make vegan white bean chili
Substitutions and tips
- Use part or a whole of a habanero pepper instead of jalapeno for a gorgeous flavor and a very spicy kick. Don't do this if sensitive to heat! You can also use a small can of diced green chiles or pickled jalapenos, or a teaspoon or less of cayenne pepper. For a less spicy chili, deseed the jalapeno or use just half.
- Use vegetable broth or vegetable stock instead of water for adding even more complex flavor to the vegan white chili.
- Use leeks instead of onions for a wonderful, sophisticated flavor, and more greens in the recipe.
- If you want more vegetables in the white bean chili, you can add finely chopped carrots and celery along with the onions. Use one medium carrot and two stalks of celery. You can also add one sweet potato or one zucchini to the chili.
Recipe FAQs
Yes. You can alternatively blend about half the soup in a blender or pulse quickly with a hand-blender.
It's good to let the chili look a little more watery than you'd like it to be when you finish cooking (see video). This is because the beans, potatoes and cashew cream will continue to thicken the chili as it stands.
This vegan white bean chili is super healthy. There are just 268 calories in one hearty serving, 11 grams of protein and 8 grams of fiber, along with tons of vitamins and minerals, in a single serving, making it wonderful food for anyone, including for weight loss.
Serving suggestions
- Top the chili with slices of avocado, crushed tortilla chips, wedges of lime and fresh, chopped cilantro.
- Make a little extra cashew cream or pumpkin seed cream and swirl it on the chili before serving.
- Serve with a dollop of vegan sour cream.
- Serve with vegan cornbread for a truly comforting meal.
Storage instructions
- Refrigerate: Refrigerate for up to four days in an airtight container.
- Freeze: Freeze for up to four months in a freezer-safe container.
- Reheat: Thaw and reheat on stovetop or in microwave until heated through.
More delicious southwestern recipes


If you make this recipe, be sure to leave a comment and a star rating below. Or tag us on Instagram #HolyCowVegan.

Recipe card

Vegan White Bean Chili Recipe
Video
Ingredients
- 1 cup dried cannellini beans (or great northern beans, cooked until tender. You can also use two 14-oz cans of white beans. Drain before using)
- 2 tablespoons extra virgin olive oil
- 1 large white onion (or yellow onion)
- 6 cloves garlic (minced)
- 2 teaspoon ground cumin
- 1-2 jalapeno peppers (chopped. Remove the white seeds if you don't want much heat)
- 1 teaspoon dried rosemary
- 2 teaspoons dried oregano (substitute with ½ teaspoon dry)
- 1 cup corn kernels (frozen or fresh)
- 2 medium potatoes (finely diced)
- 2 teaspoons adobo seasoning (optional)
- 2 cups water or vegetable broth
- Salt and ground black pepper to taste
- 2 tablespoons cashews
- ¼ cup cilantro (finely minced)
Instructions
- Blend the cashews or pumpkin seeds with ¼ cup water until very smooth. Set aside.
- Add oil to a large saucepan or Dutch oven over medium heat. Add the garlic, saute for a few seconds, then add the onions. Add salt and ground black pepper and mix.
- Add the rosemary, oregano, cumin and jalapeno peppers. Saute for a couple of minutes.
- Add the corn kernels, mix them in, then add the potatoes. Mix thoroughly.
- Add the beans and adobo seasoning, if using.
- Add two cups water and give the chili a good stir. Bring the chili to a boil, cover and simmer 10 minutes or until potatoes are tender.
- Use the back of the ladle to mash some of the potatoes and beans. This will help thicken the chili.
- Stir in the cashew cream. I really like this because it makes the chili so creamy, but leave it out if you absolutely don't want to add it.
- Garnish with fresh, chopped cilantro and serve hot. You can also squeeze on some lemon juice or lime juice for a bright flavor.
Nutrition Information
To print recipe card without images, uncheck "instruction images" after clicking the "print recipe" button.


Rebecca says
Forgot to mention,
Made this last night and meat and potatoes hubby said it was the best soup/stew I have ever made and I make a lot! Of course he watched me add a small amount of grated cheese and cashew creme so he thought it was very rich. Ha ha. Next time I will start with dried cannellini.
Rebecca says
Love your site. All the recipes I have made are delicious. I was wondering if there is a way I can get the meal plans (recipes, meal prep and shopping list) starting with meal plan 1? I can't seem to print them out and the older ones do not have the prep instructions. I notice they are geared to the seasons and I would love to have a years worth of your delicious meals.
Thank-you,
Rebecca
Anonymous says
Just delicious. I went lighter on the cayenne and jalapeño, as Someone in my house objects to spicy heat. I’m a follower now!
Vaishali says
So happy you loved it! 🙂 Thanks for following.
Emily says
I would like to double the recipe from 6 servings to 12. Could you also please provide any changes needed to pressure cooking liquid amounts and times based on doubling the recipe? I am still a beginner with my InstaPot. Thanks so much!
Vaishali says
Hi Emily, use the recipe slider (hover the cursor over the number of servings in the recipe box) to adjust the number of servings--it will automatically adjust the ingredients amounts for you. You don't need to change the cooking time in the Instant Pot. Cheers.
Emily says
Thanks so much!
Morgan says
Just made this for dinner tonight and it was absolutely delicious! ?
Vaishali says
So happy you made it, Morgan!
Mira C. says
Hi ,
I am new here .....and , I don't have pressure cooker. Can you modify this recipe for stop top or crook pot cooking ? I d appreciate recipe and method of cooking.
Thanks,
Mira
Jamie says
This was really good!! Wasn’t hard to make either. I couldn’t find coriander leaves at the grocery store so I had to do without those and it was still amazing!! I especially love the idea of the cashew cream. I will be making this again for sure
Dawna says
Looking forward to trying this! Does the recipe call for just two leek leaves? Or the leaves of two leeks?
May says
Are these cooked or raw corn kernels?
Vaishali says
Raw!
Michelle C says
I couldn't be happier finding your blog! My husband wanted Tikki Masala and found it here. Thank you for your hard work giving us such marvelous recipes, we are looking forward to trying quite a few of them. Thank you for letting us in on a pressure cooker recipe. I grew up with a pressure cooker and used one just for making mashed potatoes or potato salad maybe lentils here and there but didn't realize the benefits of it until recently. I bought the instant pot and I love it. Can't wait to make your bean soup.
Vaishali says
Hi Michelle, thanks for your kind words! I love my pressure cooker too and use it almost every day, but I've hesitated to post too many recipes because most people don't have one. I need to post more pressure cooker recipes!
Lisa Hook says
I made this on the stovetop because I do not yet have a pressure cooker. I have been wantkng one but I think this recipe may be one of the best reasons for buying one soon! YUM!
Hannah says
This looks so warming and perfect! We had a pressure cooker years and years ago, but I was too afraid to go near it :/. Now I use my rice cooker for everything. However, my husband has been missing the pressure cooker so I'm sure we'll get another one eventually. I won't be so lame about it if we do!
Claire Brown says
I must admit to not owning a pressure cooker (yet). If the beans are already cooked shouldn't this work well on the stove top? Or does the pressure cooking really enhance the melding of flavors?
Vaishali says
Hi Claire, yes you can totally do this on the stovetop but the pressure cooker helps everything cook really fast and also gives a much more tender texture to all of the ingredients which makes the chili creamier.
Catherine Hess says
Makes sense -- thanks!
Catherine Hess says
What is the deal with lentils that we shouldn't cook them in a pressure cooker? Once I know the reason I will probably honor it, but inquiring minds, you know ...
Vaishali says
Hi Catherine, I think it could be that lentils cook up in a mush and can block the pressure release valves.
Sheela says
Hello Vaishali,
I have not been able to visit your virtual kitchen for a while as I was preoccupied dealing with few life scenarios. Hope all is well on your side.
Extremely sorry to hear about Opie.
On culinary side, I see so many new recipes. Need to catch 🙂
Will be back soon.
Sheela
Vaishali says
Thanks, Sheela, and good to see you back.
Ruth Eisenbud says
This was the perfect soup for a cold, damp day. It is warming, comforting and soothing. I cooked it stove top for several hours and enjoyed all the aromas, especially the rosemary, as I worked on my computer.
Vaishali says
Ruth, so happy you liked it!
Anonymous says
Hi there! Love your blog. I have a Fagor electric pressure cooker, but the instructions say I can't cook lentils in it. Dahl is my husbands favorite thing & I am curious do you cook lentils in your electric cooker?? Thank you !!!
Vaishali says
Hi there, my pressure cooker says that too, but I confess I do cook lentils in it. It is probably not the smartest thing to do and I wouldn't recommend it.
Jeannie says
I also use a pressure cooker for my rice and beans. I would love to see more vegan recipes using the pressure cooker.
Vaishali says
Hi Jeannie, absolutely-- stay tuned!
M says
This looks goood! I'm gonna give it a try. I'm pretty sure you'd enjoy this book by Robin Robertson called "The Vegetarian Chili Cookbook". It's vegan but before the term vegan was widely used hence "vegetarian" in the title.
Vaishali says
Thanks for the recommendation! Sounds like a wonderful book and I'll look for it at the library.
Krithika says
Thank you so much for this recipe!! The story about your mom cooking rice, dal and vegetables together totally reminded me of my mother. She relies on the cooker for all sorts of dishes: stews, soups, sabhzis etc. I think she'd be absolutely lost without it.
I have some canned beans sitting around waiting to be used. I'm thinking about doing the sauteing step in the cooker directly and just adding all the ingredients and covering it later. That'd make it a real one pot meal: my favorite kind!
Vaishali says
Hi Krithika, great idea to do everything in the cooker. It would certainly work. Hope you try!
Catherine Hess says
Thanks, V, I will check it out!
Vaishali says
Hi Catherine! Both the electric and stovetop cookers I have are from Fagor. I like them-- the stovetop one whose handle broke recently has been with me for more than 10 years, and if I replace the handle I am pretty sure it will be good as new. And the electric one, which I've probably had around five years, is quite wonderful too and has a slow cooking function included. If you don't want hissy and messy, I would definitely recommend the electric version. 🙂
Catherine Hess says
Vaishali, thanks for the recipe. It looks wonderful, as does everything else you post. Can you recommend brand(s) and model(s) of pressure cookers that you have had a good experience with? The old one I have is hissy, scary, and messy, and I could use an upgrade. Thank you!