

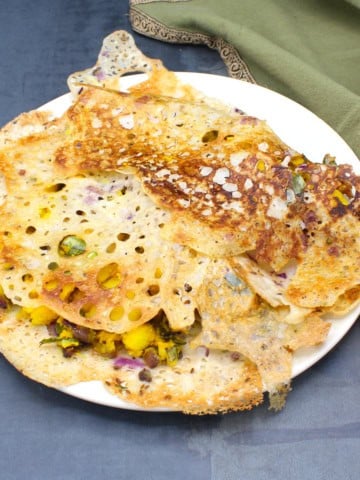
Here's my recipe for authentic and delicious idli, a traditional south Indian breakfast beloved in Indian homes everywhere. Learn how to make soft and fluffy idlis with easy tips for fermenting the idli batter, prepping the idli mold and steaming the idlis with no special equipment needed. (P.S. you don't need any special varieties of rice to do this either!)

Table of Contents
A breakfast for champions
If you love adding fermented foods to your diet, you should be making idli, a steamed rice and lentil cake. Many Indian restaurants, especially south Indian restaurants, offer idli on their menus, and it is typically served with coconut chutney and sambar, a lentil and vegetable stew.

My Tamil husband, Desi, calls idli the perfect food and that's no exaggeration because:
- Idli is made with rice and lentils, both nourishing ingredients loaded with fiber and protein.
- It is gluten-free, low in calories, kid-friendly and naturally vegan.
- The idli batter is fermented overnight and contain loads of gut-friendly bacteria, so it's the perfect food to eat for your general wellness or to nurse a sick belly back to health.
- Idlis are steamed, so you don't need any oil to make them (except just a smidgen to oil the idli mold).
- The ingredients used to make idli - rice and urad dal (black gram lentils) are both ridiculously cost-friendly.
- Finally and most importantly, idlis are out-of-this-world delicious.
Making idli batter
To make idli batter, you have to soak rice and urad dal for eight hours before blending them. The blended batter is left to ferment overnight or for 8-12 hours in a warm spot. This means idli is not a quick food - you will need to plan at least a day ahead to make it. I soak the rice and lentils in the morning, blend into a batter at night, and leave it to ferment overnight so we can have fresh, hot idlis for breakfast the next day.
Traditionally idli is made with parboiled rice (not the kind sold in U.S. supermarkets but a special variety you can buy at Indian stores labeled "idli rice.") You don't need it for my recipe. I use basmati rice, which I always have in my pantry, and it works like a charm. You can also use brown rice, I often do. Adding poha (flattened rice, used in other south Indian recipes like aval upma and dosa), to the batter makes the idlis softer, but you can skip it.
Fermenting idli batter
When idli batter is left to ferment in a warm spot, healthy bacteria, which occur naturally in the rice and lentils, go to work to digest the starches in the batter and make it probiotic. Fermenting idli batter is key not just for making idlis healthier but also for adding that slight tang that makes them so delicious, and for creating the fluffy, light texture. When the fermented batter is steamed, the gases in the batter give the idlis a "spring", much like the oven spring you get when you bake with sourdough.
Steaming idli
Idlis are steamed in an idli steamer or idli mold, a tiered steel contraption you can easily buy at Indian stores or online. But you can also improvise with glass or steel bowls that are heat-safe - my sister-in-law, Lalitha, would do this to steam idlis in the microwave or when she wanted to make lots of idlis in a hurry. Pop a steamer rack into a pot, place the bowls filled with idli batter on it, then steam away! Just be sure not to add too much batter to the bowls - it should be no more than ½ inch deep.


Recipe card

Idli recipe
Ingredients
- 1 cup urad dal (black gram dal)
- ½ teaspoon methi seeds (fenugreek seeds)
- 2 cups basmati rice (you can substitute half with brown rice)
- ¼ cup poha (flattened rice)
- 1 teaspoon salt
- 2 cups water (for blending rice and lentils, plus more for soaking)
Instructions
Soak rice and urad dal
- Place the rice and poha in a bowl. Place the urad dal and fenugreek seeds in another bowl.

- Cover the dal and the rice with at least two inches of water.
- Set the bowls aside at least eight hours or overnight. The lentils and the rice should have absorbed a good deal of water and puffed up.


Make the idli batter
- Drain the lentils and blend them with a cup of water. The lentils should be very smooth, with no grittiness at all. Remove the lentil batter to a large bowl (see recipe notes below).Drain the rice and blend it with a cup of water. This time, blend until the rice is smooth but you feel a very slight grittiness when you rub the batter between your thumb and forefinger.
Ferment the batter
- Add the rice batter to the lentil batter in the bowl. Use your clean hand to mix the rice and lentil batters together. The warmth of your hand will help the bacteria in the batter get started on the fermentation process. Cover the bowl with a lid or cling wrap. Set the batter aside in a warm spot to ferment at least eight hours or overnight. If your kitchen is cool, place it in an unheated oven with the light on.
- After eight hours or by morning the batter should be very puffy. Disturbing the surface lightly with a spoon will reveal the bubbling underneath. This is exactly what you want. Add salt to the batter and mix it in.


Steam the idlis:
- Add an inch of water to a stockpot large enough to fit the idli mold.
- Lightly oil or spray each of the cups in the idli mold. Fill them up with the idli batter, leaving about ½ cm of space at the top for the idlis to rise. To avoid making a mess, fill the bottom plate first, then slide on the second plate, fill it, then slide on the third plate, fill it, and so on.
- Place the idli mold in the pot and turn on the heat to medium high. Once the water in the pot boils, cover the pot with a lid and set the timer to 10 minutes. At the end of 10 minutes the idlis should have risen slightly and the tops should have domed.
- Remove the idli mold from the pot and let it cool about 5 minutes. Separate the plates and carefully slide the handle of a thin spoon or knife around each idli, then pop it out of the mold. Repeat for remaining idli batter, oiling the idli mold before you pour in the batter.
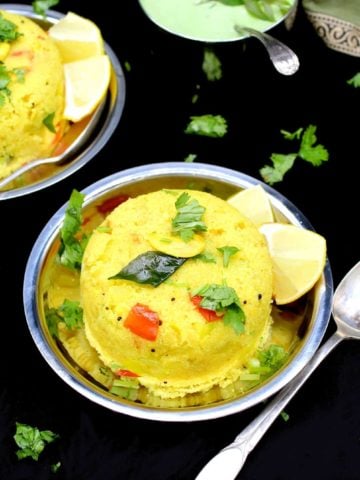
- Serve the idlis hot.


Notes
- The consistency of the idli batter should be similar to a pancake batter.
- Make sure the bowl you use to ferment the idli batter is quite large because the idli batter will rise upon fermentation. If you aren't sure it's large enough, place a plate under the bowl to catch any batter that overflows.
- The sizes of idli molds and their cups can vary. If the cups of the idli mold you are using are deeper, you might need an additional minute or two in the steamer. Pierce the center of the idli with a knife - it's done if there's no wet batter sticking to the knife.
- Don't wait too long to unmold the idlis after steaming because it will be a little harder to slide them out once they cool.
- Clean the idli mold of any bits of batter still clinging to it before you steam more idlis. Also be sure to oil the mold before each use.
- This recipe makes enough idlis to feed an army, so feel free to halve the recipe. The fermented batter can be stored in the fridge for up to a week - pop it out and make fresh idlis when you want to eat them.
Nutrition Information
To print recipe card without images, uncheck "instruction images" after clicking the "print recipe" button.
More of my favorite south Indian recipes


Published April 11, 2019. Updated and republished on April 12, 2025.


Marie says
Can I use idli rice instead of basmati rice?
Vaishali Honawar says
Yes, you can.
Niharika says
Wow. Just wow. Me and my family are greatful to you for this recipe. We are out of India, so unable to get Idli rava. Tried many recipes, but this one came out awesome. Idlis were fluffy and tasty.
For anyone looking to try .. please follow recipe to a T. And enjoy idlis.
Vaishali says
Hi Niharika, that's so great to hear. Happy you and your family loved the recipe! Thanks for the feedback.
Suzanne says
Vaishali thank you so much for this recipe. I have been trying (for such a long time) to make idlis. This the first time I succeeded. They turned out brilliantly. The only mistake I made was using the Urid Dahl that still had the skin on. So the mixture was a bit speckled but this really wasn't a problem they tasted amazing. Thank you for all your wonderful recipes. We live in Australia (Brisbane) but my family is from India. Thanks to you I have been able to make them all the wonderful food that they have missed for so long X
Vaishali says
Hi Suzanne, I am so happy to hear that the idli recipe worked for you. Great that it worked out with the urad dal with skin on. Thanks for sharing that.
Annapurneshwari says
I had been struggling making idlis for years. Batter would come out too thick and would not ferment properly or too thin and drip through the wholes on the stand. Some days it would over ferment, the others not ferment at all. I got tired and gave up. This recipe gave me perfect result from the first attempt. I used idli rice though, the rest was as described.
Vaishali says
So happy you loved the recipe and good to know you used idli rice. BTW I love your name. It's what my husband sometimes calls me because, he says, I feed the family. 🙂
Hilary Minor says
This recipe hits the spot! I've just made my first, ever, batch of idlis and they have turned out so well. The recipe is written with such clarity the idlis almost made themselves! I had thought that the making of idli would be very, very fiddly (!) but, in fact, turned out to be simplicity itself and I have spare batter to make another batch - even though I halved the quantities given here. My idli mould makes 20 idlis and fits perfectly into my Prestige High Dome pressure cooker. Brilliant 🙂
Vaishali says
Hi Hilary, that's so awesome to hear! Congratulations on making your first idlis (and happy the process wasn't fiddly lol!). ❤️
Shaheen says
i like your recipe very much, need more related recipe
Vaishali says
Thanks Shaheen, I have lots of south Indian recipes on the blog.
Antoinet says
Hi there,
Thank you for the amazing recipes.
Can I make these without parboiled rice?
Vaishali says
Hi Antoinet, you don’t have to use parboiled rice. Just use more of the white or brown rice instead.
Deb says
Hi Vaishali,
Can you explain why the rice needs to be coarse ground? Why does finely ground rice adversely affect the outcome?
Thanks,
Vaishali says
It helps make the idli fluffier. Rice ground fine would result in a dense idli.
Nidhi says
Does the ratio remains 1:2 for urad dal and rice if I just used par boiled rice and not any other white or brown rice. Last time my idlis were super sticky and uncooked when I used 1:2.5 ration using only parboiled rice. Could not even make dosas out of it as the batter was not spreading on the tawa. It was all very sticky. I feel I may have grinded rice more than needed. The idlis were raw from inside and flat even after 12-15 minutes of cook time.
Sunitha says
What do you mean by brown rice, is it raw rice
Vaishali says
Just brown rice, rice that doesn’t have its bran removed. You can use white rice.
Joane says
Hi! Can the batter or cooked Idli be frozen? I'm live alone and don't think i can eat a full batch on my own! 🙂
Vaishali says
You can freeze the batter after it’s fermented. Thaw completely on the counter before using.
Anonymous says
Thank you
realbharat idli says
Hi, It is nice recipe and the idli making process seems more simpler now. I also prepared Idli upma on weekends.
kala says
hi vaishali, can i ferment idliy batter in instant pot, if so how do i do it? can i use uncle bens parboiled rice. thans for the lovely recpies'. hope to hear from you soon.
Vaishali says
Hi Kala, you can set the IP to the yogurt setting for 12 hours--place the batter in the steel liner. You can leave the valve open or closed, or just use the glass lid of the IP. I don't advise using Uncle Ben's because it doesn't really work for this recipe.
Anonymous says
thanks for the reply.
Rupa says
Hello! Can u share the recipe of the green chutney which is in the image of the idli chutney.
Vaishali says
Yes, will do soon!
mamta says
Hi :
Thank you for the recipe. I have always wanted to make idli batter at home but never really tried it because I thought not being from south indian origin I wont be able to make it at home. When I came across your recipe, I just made it the way you had explained it and it came out pretty well.
Vaishali says
So happy it worked out for you!
Shobana Ramkumar says
The trick is in the grinding. I add 2 ½ cups of par boiled rice and 2 ½ cups of white rice ( could be brown too though it’s coarser and takes longer to soak and grind) for 1 cup urad. For people looking for an easier option, adding a ladle of cooked rice at the grinding will give soft idlis
Rishni says
I am south African Indian. We make sweet idli. Can I follow this recipe up to fermentation and add like half cup sugar n then steam. Eat on its own. No chutney
Vaishali says
Hi Rishni, what a delightful idea--I can't say I've heard of sweet idli before. I think adding sugar should be fine!
Suman says
Very nicely explained. Healthier version too.
Isn't there a video to show the method.
What's a stock - pot, please send a picture of it.
Renga says
You have not mentioned to add salt
Vaishali says
I don't add salt to my idlis -- I don't think they need it. If you do want to add it, add it after your batter has fermented and before you make the idlis, because salt can adversely affect fermentation.
Krithika says
Soft idlis are my nemesis! Since coming to the US, I have made dosas, rava idlis and countless other dishes. But cotton soft idlis have eluded me. I took them for granted while growing up, and now they mock me! I always blamed my blender for not getting the rice ground perfectly, but I'm intrigued at the thought that only the daal needs to be finely ground. I will try this again following your instructions: they haven't failed me before 🙂
Vaishali says
Hi Krithika, The rice needs to be a little coarser -- not in large pieces, but like liquid rava. I used to grind the rice very smooth too before realizing my mistake.
kim says
hi!!!
my 2 cents
im a cook n baker
invest in a {VITAMIX BLENDER
you will be THANKING me
be well!
kim
Pri Shah says
Please elaborate how you use the vitamix for this
Becky says
I am getting hungry just looking at these. I love love love idlis. there's south Indian restaurant where I live and it's always the first thing I order. I am definitely going to try!
Vaishali says
Hope you do, Becky!
Alamelu says
Can't wait to try. After failing 3 times i have given up making idli's. Made Ragi idli batter yesterday.
Will make this evening to test first if not we get dosai ????
When do you add salt. I was told to add salt after fermentation by some and after grinding from few friends??? Don't see salt in your recipe??
Thanks and wish me luck
Vaishali Honawar says
Hi Alamelu, good luck! 🙂 I don't add salt to my idlis, just so we can cut down on the sodium and because the chutney and sambar have it. But if you want to add, definitely add it after the fermentation because salt can inhibit the growth of the good bacteria. Cheers.
kala says
hi vaishali, can i use unclebens parboiled rice for the idlies.
Vaishali Honawar says
Yes, I use a variety I buy at supermarkets here too-- not necessarily the one from the Indian grocery store.