

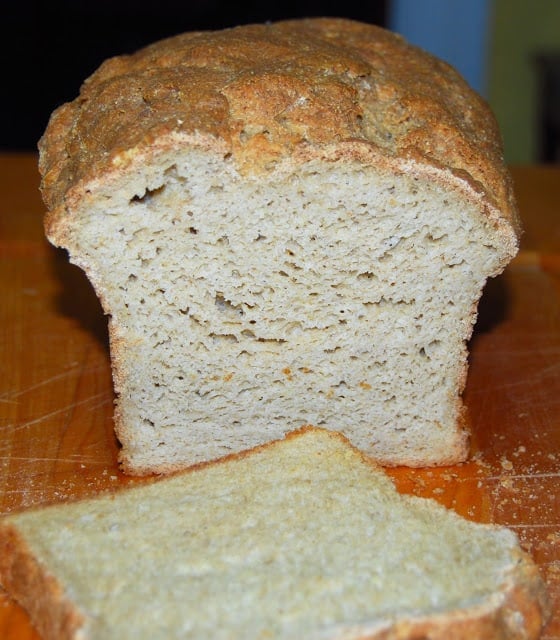
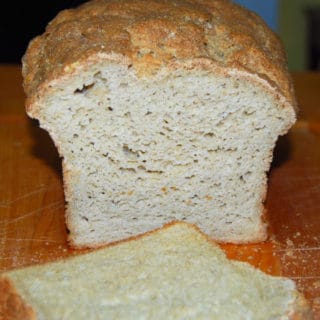
This foolproof Vegan and Gluten Free Sandwich Bread rises a mile high and has a tender, delicious crumb. Also, tips for successful gluten-free bread making.
I've been experimenting more with gluten-free baking, and today I wanted to share a foolproof recipe for a wheat free and therefore gluten free sandwich bread. Vegan, of course.
I bake a lot and I love baking breads most of all. But I had rarely baked a gluten free bread, unless you count some Indian flatbreads like bhakris and missi rotis, made with flours like millet and sorghum and corn. So when I rolled up my sleeves and set out to bake a gluten free bread, I did a lot of reading and incorporated a lot of the advice in my recipe. Here's what I learned:
- Start with an open mind, especially if you're a seasoned baker, because all of your long-held notions about baking bread will be challenged. Gluten free breads present a fundamental conundrum: gluten is the substance that gives breads structure and helps them rise (it's why you knead bread dough so much-- to develop those gluten strands that will stretch and make your bread grow big and light and airy in the oven). So then how do you get a bread that lacks any gluten at all to rise? Relax, because there is an answer: xanthan gum. This thickener adds viscosity and elasticity to a gluten free bread dough, allowing it to rise in a hot oven, much as a wheat bread would. Xanthan gum can easily be found at stores like Whole Foods or online.
- Take time to mix your ingredients thoroughly, even if there is no gluten to develop. You will find lots of websites that say you don't need to knead your dough, but trust me, mixing it for a decent period of time ensures that you get your dough to just the right consistency.That's because gluten-free flours tend to be rather thirsty and you want to give them time to absorb all the liquid they can.
- Your gluten-free dough will look different: more like muffin batter than the average wheat bread dough. Don't be tempted to add more flour. The wet dough will help create an airier bread. Also-- big bonus!-- your gluten free bread needs just one, not two, rises, saving you time.
- Your baked gluten free bread will also look different. Because of the wet batter, the finished bread will have a rather shaggy look to it, not unlike a banana bread, cracks and all. But who cares when it looks great sliced and tastes even better.
- Your gluten free bread will taste different, because gluten free flours tend to have a more robust, earthier flavor than wheat does. One of the ways to combat this is to use lighter flours like rice flour and oat flour in combination with some of the stronger-tasting ones, like millet or sorghum.
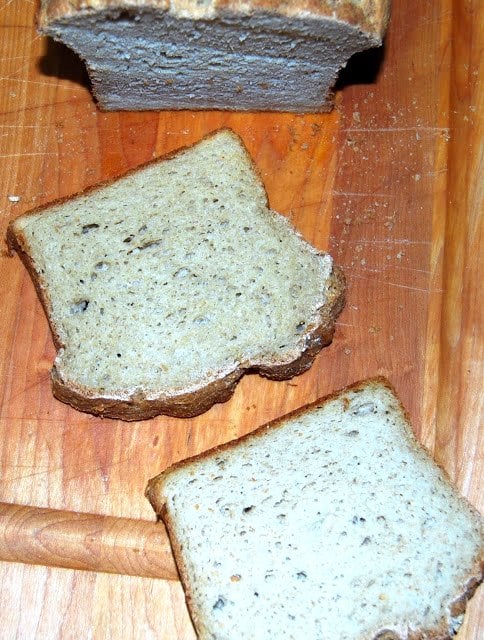
So now that you are privy to some secrets of successful gluten free baking, let's fire up that oven and get started. This gluten free sandwich bread uses millet flour, rice flour, and oat flour (be sure to buy one that says gluten free, because some oat flours can be contaminated with gluten while processing) and tastes, I think, as close to a wheat bread as can be. It also toasts really well.
Enjoy, all!
More gluten-free recipes:
- Gluten-Free Sourdough Sandwich Bread
- Gluten-Free Sourdough Boule
- Gluten-Free Irish Soda Bread
- Vegan Gluten-Free Naan
- Savory Cucumber Pancakes

Recipe card
Vegan Gluten Free Sandwich Bread
Ingredients
- 1 ½ cups millet flour
- 1 ½ cups oat flour (make sure you buy one that's labeled gluten-free)
- ½ cup rice flour
- ½ cup tapioca starch
- ¼ cup flax meal
- 2 tablespoon egg replacer (can substitute corn starch)
- 2 tablespoon xanthan gum
- ½ teaspoon baking soda
- 1 ¼ cups warm water
- 2 ¼ teaspoon of active dry yeast (1 packet)
- 1 cup almond milk
- 1 teaspoon vinegar
- 1 tablespoon maple syrup (can substitute sugar)
- 1 ½ teaspoon sea salt
- 2 tablespoon extra virgin olive oil
Instructions
- Add the yeast and maple syrup to the water and let stand until the yeast starts to bloom, about 5-10 minutes.
- Whisk the milk with the vinegar and set aside for five minutes.
- Mix the various flours together with the baking soda, flax meal, egg replacer, and xanthan gum. Whisk everything thoroughly to ensure it's all mixed together.
- Add the almond milk to the yeast-water mixture along with the flours and salt.
- Mix using the paddle attachment on a stand mixer or by hand. Drizzle in the oil as you mix. Continue to mix for about 8 minutes or until everything's well-incorporated and you have a fairly smooth-looking, batter-like dough.
- Oil a standard 9 by 5 inch loaf pan. Pour the dough into the pan and, using a spatula, even out the top as best as you can.
- Cover with a kitchen towel and let it rise in a warm place for 60-90 minutes or until the dough has domed around the top of the pan.
- Preheat the oven to 350 degrees Fahrenheit and bake the bread for 55 minutes. Insert a thermometer in the middle at the end of baking-- it should register at least 200 degrees.
- Remove the loaf from the oven and let it stand on a rack until cool enough to handle, about 20 minutes. Remove from the loaf pan and continue cooling the bread on the rack.
- Enjoy!
Nutrition Information
To print recipe card without images, uncheck "instruction images" after clicking the "print recipe" button.


Connie says
I made this recipe but it didn't rise. I often have this problem in my cold kitchen. I bought heating mat but that didn't work. Any suggestions? The f l average was good.
Connie
Vaishali says
Have you tried putting the dough in an unheated oven with just the pilot light on for the rise?
Kathleen says
Has anyone ever tried using sorghum flour instead of millet?
Morayah says
I just left a comment a few minutes ago. I forgot to mention, I omitted the xantham gum. I never use it. I always replace it with flax meal. And the ingredient list already had Flax meal. Perfect! 🙂
Morayah says
Hello! Although I had this recipe saved in my favorites since last year, it wasn't until today I made it. I can truly say so far it is the best Gluten Free Sandwich bread recipe I have made. I only made one change. I used 1 egg instead of the egg replacer. Everything else was left exactly as it is. It is good consistency. It is crusty on the outside and soft inside. The flavor is good although just a bit bland. I think it might be due to the maple syrup. I will substitute with brown sugar next bake. Other than that I love this bread!💖 I know tomorrow it will be lovely toasted with cream cheese or fruit jam. I will mention this excellent find on my blog. Thank you. Brilliant recipe!😌🦋
Maggie says
Awesome? A bread that you can slice
Thank you so much
Samantha says
This bread had me worried, because it didn’t initially rise like some of the others that I have tried, but it. Is. Great!! It is so difficult to find a bread recipe that has no gluten, eggs, dairy, or tree nuts. It baked up so well and has good structure and substance. The crust is so good and it didn’t fall like some of my other recipe attempts. It makes wonderful sandwiches and I can’t wait to make the kiddos grilled cheese! I wish I could add photos because this is my new go-to bread recipe!
Aqila says
Heyy .. great recipe! Could you tell me for how long I can store this loaf in refrigerator?
Vaishali says
Gluten-free breads tend to dry out fast, so prob not for more than a week!
Lorena Beedle says
What can I use in place of the Xantham Gum that is more natural. Pectin? Chia? Flax? How much do you think of these I could use in place of Xantham?
Mischa says
You can sub 1 part of xanthan gum with 2 parts of psyllium husk
Jen says
I made this recently and it turned out amazing. I just used regular gluten free flour but did the rest of the recipe the same. It rose nice and high and the texture was very similar to ‘regular’ white bread.
sassygirl says
i've made this recipe many times and must say that it is amazing!
the first time...you are absolutely right: you need to be patient when attempting GF baking; it is not an exact science!
subsequent tries have turned out better and better: i now use combinations of
oat, white sorghum, brown rice (for light
texture), amaranth flours.
no xanthan gun (nasty stuff) :/
i use the 'neat egg' in its place and also
to replace the egg replacer.
great recipe!
better toasted the next days.
YUM!!
thanks.
🙂
Pallavi says
hi
can you post the proportions of the oats, sorghum, brown rice and amaranth flours that you used for the gluten free bread
deedelicious1 says
Did you brush anything onto the loaf before baking?