

If you've been looking for the best vegan sandwich bread recipe, your search ends here. I've tried and tested this bread dozens of times so you can enjoy the foolproof results. It has a creamy flavor and a fluffy, tight-knit crumb that's good not just for sandwiches but also for a generous daub of vegan butter or dipping into soups and stews! If you're a new baker I'm sharing all of my best breadmaking tips here.

Table of Contents
Homemade vegan sandwich bread
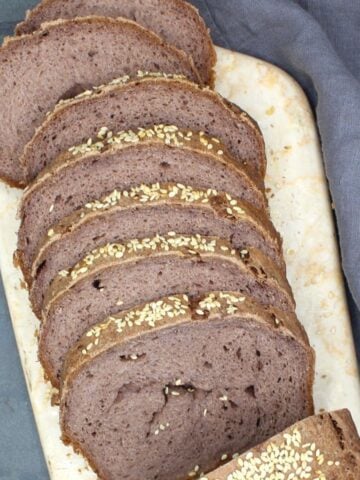
Every vegan home baker needs a basic recipe for an excellent loaf of sandwich bread, and here's mine. It has a soft, golden-brown crust and a creamy, fluffy crumb that will win you over with its delicious flavor. And it slices beautifully.
It's easy enough to buy sandwich bread at your local supermarket or bakery. But I find there's nothing quite as satisfying as baking my own sandwich bread, with ingredients I know are good for me and without preservatives. Some store sandwich breads can also contain milk or eggs. Once you've made this bread you'll agree that no store-bought bread ever tasted this good!
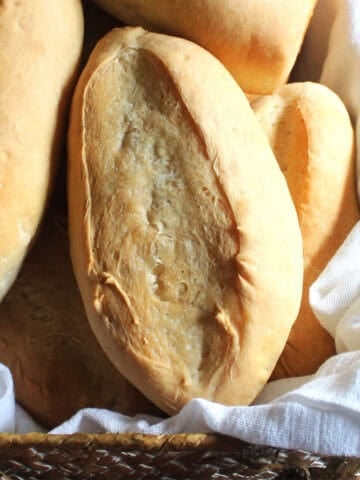
I designed this bread recipe to make it very easy and foolproof for a new baker. But even if you are an experienced bread maker I guarantee you will love it. The dough is delightful to work with -smooth, supple and very versatile. You can shape it any way you want to, as a boule, a batard or a baguette-shaped loaf, and it will turn out perfect each time.
If you've been using my old recipe for sandwich bread, heads up that I've changed it to make it even better and more foolproof. This recipe makes one loaf (the old recipe was for two loaves). Just double the ingredients if you want to make two loaves.
This is now my go-to bread, one I make almost as often as my beloved sourdough sandwich bread. It is really soft the day it's baked and the day after, but if you don't use it up in a couple of days it makes delicious toast.
You can get this bread done in about three hours, including two one-hour proofing times. Here's the schedule I follow when I want it in time for dinner:
2 p.m.: Make the dough and let it rise for an hour.
3.15 p.m.: Shape the loaf and let it rise for another hour.
4.10 p.m.: Preheat the oven
4.20 p.m.: Put the risen bread in the oven and bake 35 minutes.
4:55 p.m. to 6 p.m.: Cool the bread on a rack.
Recipe card

Vegan Sandwich Bread
Ingredients
- 2¼ teaspoons active dry yeast (or instant yeast)
- 2 tablespoons sugar
- ¾ cup soy milk (or any nondairy milk, lukewarm)
- ½ cup warm water
- ¼ cup extra virgin olive oil
- 3 cups bread flour (360 grams. Measure with a scale or by gently scooping the flour into the cup measure and then leveling off. You might need a little more flour on a humid day.)
- 1¼ teaspoons salt (use less if on a low sodium diet)
Instructions
Make dough
- Mix the yeast and sugar in a large bowl or the bowl of a stand mixer. Add the warm soy milk, whisk to mix and set aside five minutes until the yeast froths.

- To the yeast and milk, add water and oil.
- Add 3 cups of bread flour and salt to the bowl. With your hand or a stand mixer set to medium low speed, mix the flour into the liquid mixture until a dough forms.
- Continue to knead for seven minutes. When you are done the dough should feel just slightly tacky and soft but it should clear the sides and bottom of the bowl. If the dough sticks to the bottom of the bowl, add more flour, a tablespoon at a time, until you have the right consistency.


First proof
- Form the dough into a smooth ball and place in an oiled bowl, turning over once to cover the top with oil. Cover the bowl tightly and set it aside in a warm spot, like a cold oven with the light turned on.
- After an hour, the dough should have doubled.


Shaping and second proof
- Turn out the dough on your work surface and gently deflate it. You should have a disc.
- Roll the dough, like you would a jelly roll, and place it seam side down. Fold the sides down and under the loaf.
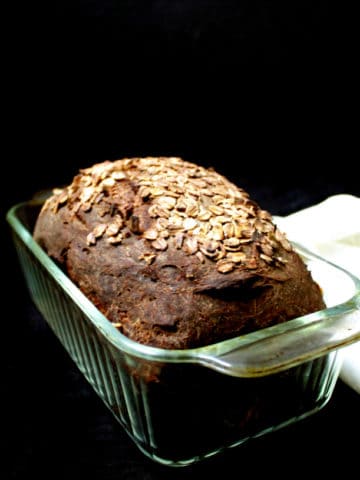
- Oil a 9 inch by 5 inch loaf pan (an 8-inch by 4 ½ inch pan is also fine, the loaf will dome higher). Place the loaf inside the pan.
- Cover the loaf loosely - a clean shower cap works very nicely for this. Set it aside in a warm spot to rise for another hour. After an hour the loaf should have risen and domed over the pan.


Bake bread
- About 10 minutes before you start baking the bread, preheat the oven to 350 degrees Fahrenheit/180 degrees Celsius. Place the loaf in the preheated oven and bake 35 minutes.
- Cool the bread on a rack for about 30 minutes, then unmold and continue cooling on the rack. Slice and serve after the bread has cooled thoroughly.

Nutrition Information
To print recipe card without images, uncheck "instruction images" after clicking the "print recipe" button.

My top tips
- If using active dry yeast, make sure you "bloom" it first in warm milk to check it's alive. I can't stress this enough - bad yeast is the main reason why dough will not rise.
- Use any non-dairy milk for this bread but if possible, lean toward soy milk. Soy milk has more protein than most non-dairy milks and the protein will give the bread a softer, finer crumb.
- Bread flour will give you the best results for this sandwich bread. If you don't have bread flour, you can use all-purpose flour (I did in my old recipe) but the bread won't rise as tall. You will also need to reduce the amount of water in the recipe to ¼ cup and add more if needed.
- Proof the bread dough in a warm spot. Even in summer, an air-conditioned home can get quite cool so don't leave it on the countertop and hope for the best. The optimal proofing temperature for bread dough is between 72 degrees and 78 degrees Fahrenheit (22 degrees to 26 degrees Celsius). I usually proof the bread in a cold oven with the oven light on.
- If you are a new baker, practice my three keys to baking bread successfully: precision, patience and practice. Make sure you measure your ingredients precisely (weigh them if possible) and follow directions for kneading, rise times and baking as written. Be patient and take time to knead and proof the bread for as long as instructed. Finally, practice. Don't expect your first loaf to be perfect, and don't expect to get better if you don't keep at it. My own journey to becoming a home bread baker was laced with pitfalls and disappointments. The only reason I can bake great bread today - and create recipes good enough to share with you - is because I didn't give up.
Frequently asked questions about making vegan sandwich bread
You can substitute some of the bread flour with whole wheat flour. I would use no more than 1 cup. If you're looking for a fantastic, wholegrain recipe you might want to try this rye bread.
I use olive oil - I think it adds great flavor to the bread and it's healthier. If you are worried you will taste the olive oil, you won't. You can also swap it out for another oil, including avocado oil, grape seed oil and sunflower oil.
Yes! Follow the instructions on your machine for making sandwich bread.
Store the bread at room temperature for up to two days and in the refrigerator for up to a week. Freeze in a freezer-safe bag for up to four months.

Recipe first posted July 12, 2009. Updated and re-published on August 1, 2025.


Ollie says
I don’t often leave reviews but this recipe is so good I just had to!
Meenal says
This recipe looks amazing. Thank you so much for all the work that you do!!
Keep doing what you do! 💚
Lina Prema POLMONARI says
Good morning from the province of Milan, Italy.
I just baked the bread of this recipe. It's amazing, very fragrant and soft.
It's the first time I make a box of bread. It's leavened which is a wonder. It's very light. It’s a pity I can't attach photos.
My sister is excited. A few days ago I cooked eggplants with tomatoes and spices. A goodness accompanied by a hearty plate of spaghetti. Thanks for sharing your vegan recipes
Have a nice day cooking. Hugs and kisses
Vaishali says
Yay!! So happy you tried the bread and the eggplant. Thanks for the review. Hugs.
Wendy says
I think it is the best sandwich bread I have made and I’m keeping this recipe. I used oatmeal milk.
It was perfect. My husband is not vegan and he loved it. Thank you for sharing your
wonderful recipes on your blog.
Allan Richardson says
Hey Vaishali. Your recipe is superb, and it's my go-to 🙂
But I meddled with it, and I know you can unmeddle it for next time lol
I wanted a single loaf with larger dimensions, so I used the same recipe and process, plus before the last rise, I folded in a very moderate quantity of raw buckwheat ~ a tablespoon ~ and half a tbsp each of hulled hemp hearts and saw white quinoa, just to see how they'd work. And like before, a few sesame seeds on a light oat milk wash.
Again, super delicious, but bit denser.
It didn't have the light and airy crumb, which had always remained perfect; old, new, toasted or thawed! 🙁
I don't believe there was enough mix to have much of an effect. Or the slightly larger loaf tin; just an inch longer.
I used 2 1/4 cups organic Spelt, and 1 1/4 cups wheat flour; the same flours as I used the previous times, though an extra quarter of a cup of each.
Throughout the process, it rose beautifully, although I was afraid I may have been a bit too enthusiastic with the arm workout! I'm certain I didn't knead it for 10 minutes the previous times! More like 3 mins, from my imperfect memory lol
Because my oven is reliable - I've checked it with my oven thermometer - I checked the loaf at 30 minutes, and the internal temperature was 196/197 F. I gave it another 5 mins, still on 400°F and it returned 207F. Just fine.
I probably should have just used the regular tin, to make it higher. I did consider covering it with Al. foil for the first 20 mins or so, but initially tried the same time/temp as the 2 loaves.
Sorry it was such a mouthful, but some of your readers may be interested.
Thanks again, Vaishali. I'll revert to the original until you weave your magic xo
Vaishali says
Hi Allan, try subbing bread flour, which will give you a better rise. I've redone this recipe to improve it by adding bread flour and soy milk. I think both those additions would benefit the recipe you're trying to make.
Steph says
I'm lactose intolerant so I needed a vegam bread recipe. I just tried making this for the first time and I'm super happy with how it turned out! I used oat milk and canola oil (I ran out of avocado oil). I'm excited to have a sandwich using this bread tomorrow! Thanks for the recipe 😁
Vaishali says
So happy to hear, Steph!
Anonymous says
Absolutely perfect! I’ll never need another vegan bread recipe again. The only substitution I used was olive oil in place of avocado, and I let my bread machine do the dough work. Baked in the regular oven following the instructions. Tastes phenomenal, great texture—soft on the inside and crispy crust. Thanks so much for the recipe!
Vaishali says
Awesome! So happy you loved it.
Stefan Cartmale says
Recently found out I am allergic to casein and have been looking for a good bread recipe with zero dairy. This one isn't bad! I personally had to modify it to 5 cups of flour as anything less was just a soggy mess. I start with 2 1/2 cups flour in my stand mixer and add a half cup every few minutes until I reach 5 and a nice consistency. After the 2nd rise and before the loaf pans, I add flour as needed in my work surface to keep the dough from sticking to everything. I also reduced the salt to 3/4 tbsp as 1 full tbsp was too much for my taste. Bread rises very well, I don't skimp on the mixing stage- letting the dough really kneed together for long sticky strands. Very crusty when it comes out of the oven but very soft interior. Really nice! I'd give it a try- for now it will be my dairy free go to recipe. I use Sproud unsweetened pea juice but I guess any white juice such as almond or soy would work. I like the pea juices as they contain a higher protein content than oat/almond/etc.
Vaishali says
So awesome you tried the bread, Stefan. Thanks for the detailed feedback, very helpful!
Ebony says
Could you advise how I would divide the dough into & mini loaves? If so, are the extra loaves able to bw stored in the freezer until needed? I’m making them for my son for days he has sandwiches for lunch at school and don’t want to include any soy as most vegan white breads do.
Vaishali says
Hi Ebony, you could get eight mini loaves but you should reduce the baking time to about 25 minutes. And yes, you can store in the freezer.
Kathy D says
This is my favourite sandwich bread!!! Springy and delicious, easy to add herbs to as well. Love this recipe
Vaishali says
So happy to hear, Kathy!
Anne-Marie says
Can this recipe be used to make dinner rolls or buns?
Vaishali says
Yes, absolutely. but cut down baking time to about 25 minutes.
ELSA BEATRIZ HERRMANN says
I just made your bread I'm not sure what happened by the third rice did not form a high Dome as you indicated. Also the cross is extremely crunchy. The inside soft I haven't try because I'm fasting. My husband is eating two pieces with butter right now LOL. I followed the recipe to the T, during the second Rise my dough deflated by itself. However I did what you indicated I'm play them into loaf pans. Waited almost three hours to rise a little bit. It was enough for me to put them in the oven and they look like sandwich press not as high as I would like. I'll try a piece tomorrow let you know. The loaves do not look as golden as in the picture. I live in Florida with a high humidity by my other Artisan breads came out perfect. What happened?
Stefan Cartmale says
I personally believe that it sounds like your yeast is either old and not very active or you aren't giving it enough time to proof. One more culprit could be adding salt too soon as salt will kill your yeast if added to the 1/4 cup water mix. Just thoughts- hope this helps.
Evelyn says
Can you provide some gram measurements for your Crusty Sourdough bun recipe that is made without Yeast?
Patricia says
Though you could say it's my fault for not fully reading the recipe, but the total time for this recipe is EXTREMELY misleading. I started this recipe hoping for a quick bread, it definitely isn't. This does not take 40 minutes and the time should be changed. The dough is currently on its first proof, out of THREE proofs. Hopefully the bread is worth it, but it's already irritating that the timing is not correct.
Vaishali says
I've updated the recipe to reflect the proofing time.
Samara says
I used the exact measurements and my dough is always way too wet. I find that I have to add at least 3 cups of flour to get it to form a ball. I let it rise in my oven since we have AC. As soon as I take it out the oven so I can preheat the oven it shrinks. I've also experienced it shrinking once i placed it in the oven. Can you offer any tips. I really want to get this recipe to work. Its more cost effective for larger families since you get 2 loaves instead of one like most recipes online.
Vaishali says
Hi, I've never heard of dough shrinking before, so not sure what's happening. Only thing I can offer is to advise you to handle risen dough more carefully. Setting down your pan too hard or touching the loaf unnecessarily with too much pressure could cause it to deflate.
pk says
Could you modify your total time to include rise/rest time. So many times, I seek recipes based on time. Only to discover that the rise time was not included in the total time. Either add an additional notation or correct the total time. Actually, this recipe's total time has an additional 3-1/2 hours to produce this bread, not 40 minutes.
But aside from the time, your bread recipes are delicious. I am about to make this and I expect it to be good, as I have made your French bread recipe many times...it is so good.
Muriel says
What can u use if don’t have avacado oil for the bread receipe
Vaishali says
Any vegetable oil is fine.
Jennifer says
Made this today! It’s fantastic...I used ripple for the “milk” and the texture was fabulous. Slathered a slice with strawberry jam and it was the perfect treat after being cooped up these last few weeks. Dropped off the second loaf for my neighbor.
Vaishali says
Thanks for the feedback Jennifer, and so happy you and your neighbor enjoyed it. 🙂
Krithika says
This looks delicious! We're running low on all purpose flour in many stores here, but maybe I can find bread flour. Do you think I could halve this recipe? For a single loaf?
Vaishali says
Yes, you can definitely halve.
Anna says
I have this bread in the oven now. Can’t wait for it to come out. I had to use quite a bit more flour than you indicated but I am comfortable making bread so knew what texture I need to get it to. I decided to try it as one large loaf and it grew so huge with each proofing. I hope it doesn’t rise right out of my pan.
Vaishali says
Hope it worked out! 🙂
Ebony says
Could you advise how I would divide the dough into & mini loaves? If so, are the extra loaves able to bw stored in the freezer until needed? I’m making them for my son for days he has sandwiches for lunch at school and don’t want to include any soy as most vegan white breads do.
Tanya says
This bread looks amazing!!! Ok. I read the bit on flour. I have unbleached all-purpose (King Arthur). Will that work? I don’t have bread flour...didn’t even see it in the store).
Thanks
Vaishali says
Yes, all purpose flour is fine!
Tanya says
Thank you for the reply. One more thing...just making sure 1 Tbsp of salt is correct.
Vaishali says
Use as much salt as you want it doesn't make any difference. ?
Peggy says
Can this be made in a bread machine?
Ilana says
If I don’t have any type on non-dairy milk will water work?
Vaishali says
Water will give you a crustier bread, so the crust won't be like sandwich bread but more like French bread. If that works for you, go ahead.
Andy says
So, my wife is feeling sick and requested some bread. But since there’s a pandemic and a giant ice storm, I decided to make some instead of risking a trip to the store. This is my first time making bread.
What am I supposed to do with the yeast I set aside in step one? I didn’t notice it until a had the oiled dough in the bowl. I’m gonna hazard guess that’s why my bread hasn’t risen much for the last hour and a half.
Vaishali says
You need to add the flour and other ingredients to the yeast.
Mahesh says
Wt is the weight of the loaf which u had made in shown picture?
London Accountants Worker says
This looks like the perfect sandwich bread! Thanks for the recipe!
Namrata says
Lovely bread! I tried the recipe today and it came out perfect. I made with regular milk and canola oil instead of shortening. I have been browsing your blog for a while though first time commenting. You have a nice corner here with not so complicated recipes. I am lacto-vegetarian so can relate to so many recipes. Also tried Mushroom biryani..yum. Thanks for sharing.
Mama jj says
I tried the recipe last night and doing a second time right now. The bread turned out crisp on outside & perfectly soft inside in a glass and a metal pan. Smells fantastic, tastes great, and beautiful brown color. Thank you so much for the vegan bread recipe and especially for taking the time to add all the little details that my dummy self needs to cook successfully in the kitchen! Everyone that walks in my house says, "Oh my it smells good in here!" Thanks again and God bless 🙂
VegHead says
I'm so excited to try making this bread!I was just wondering if you knew how many calories were in it? I've been trying t watch my weight lately. Thanks(:
Kitchen worktops guy says
What ruins sandwiches for me is always the bread - I feel like it's wasted, somehow, compared to the filling. But finding the perfect bread will be the solution! But the perfect bread will vary according to the filling, right?
annie says
Vaishali, What size pan do you use?
Vaishali says
They are both roughly 9 by 5 inches-- standard size loaf pans.
Thamarai says
hi Vaishali,
Can I not use shortening? I have some vegan butter sitting in the fridge and I need to use it up. Any suggestion on the substitution quantity? I was just reading today about the kind of unimaginable ingredients that go into store bought bread to make it bake quicker and I was kind of shocked. I am seriously going to start baking my own bread at home. I have tried previously but it ended up smelling very yeasty. But will give this one a try for sure. Thanks again!
Vaishali says
Thamarai, absolutely. Just replace it with the same amount of vegetable oil. And yes, it's really shocking what manufacturers add to breads, especially the preservatives. A study last year found that breads are the leading source of sodium in the American diet.
Vaishali says
Anonymous, you can definitely freeze this bread but thaw completely before using. And you can also use it to make garlic bread, although a more crusty bread like my whole-wheat French bread would be even more delicious as garlic bread.
Anonymous says
Very excited to try this recipe...thank you so much for posting it!! My husband and I went vegan about a month and a half ago, and I haven't been very happy with any store-bought bread. I do have a question...is there any reason I wouldn't be able to freeze a loaf once it's already made, or use it as I would use store bought (ie broil it for garlic bread, etc)?