

If you've been looking for the best vegan sandwich bread recipe, your search ends here. I've tried and tested this bread dozens of times so you can enjoy the foolproof results. It has a creamy flavor and a fluffy, tight-knit crumb that's good not just for sandwiches but also for a generous daub of vegan butter or dipping into soups and stews! If you're a new baker I'm sharing all of my best breadmaking tips here.

Table of Contents
Homemade vegan sandwich bread
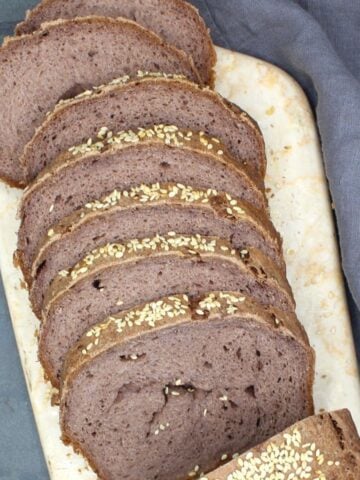
Every vegan home baker needs a basic recipe for an excellent loaf of sandwich bread, and here's mine. It has a soft, golden-brown crust and a creamy, fluffy crumb that will win you over with its delicious flavor. And it slices beautifully.
It's easy enough to buy sandwich bread at your local supermarket or bakery. But I find there's nothing quite as satisfying as baking my own sandwich bread, with ingredients I know are good for me and without preservatives. Some store sandwich breads can also contain milk or eggs. Once you've made this bread you'll agree that no store-bought bread ever tasted this good!
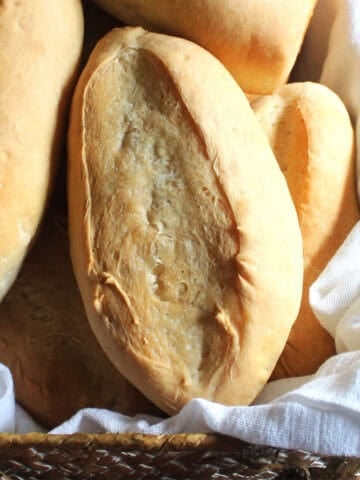
I designed this bread recipe to make it very easy and foolproof for a new baker. But even if you are an experienced bread maker I guarantee you will love it. The dough is delightful to work with -smooth, supple and very versatile. You can shape it any way you want to, as a boule, a batard or a baguette-shaped loaf, and it will turn out perfect each time.
If you've been using my old recipe for sandwich bread, heads up that I've changed it to make it even better and more foolproof. This recipe makes one loaf (the old recipe was for two loaves). Just double the ingredients if you want to make two loaves.
This is now my go-to bread, one I make almost as often as my beloved sourdough sandwich bread. It is really soft the day it's baked and the day after, but if you don't use it up in a couple of days it makes delicious toast.
You can get this bread done in about three hours, including two one-hour proofing times. Here's the schedule I follow when I want it in time for dinner:
2 p.m.: Make the dough and let it rise for an hour.
3.15 p.m.: Shape the loaf and let it rise for another hour.
4.10 p.m.: Preheat the oven
4.20 p.m.: Put the risen bread in the oven and bake 35 minutes.
4:55 p.m. to 6 p.m.: Cool the bread on a rack.
Recipe card

Vegan Sandwich Bread
Ingredients
- 2¼ teaspoons active dry yeast (or instant yeast)
- 2 tablespoons sugar
- ¾ cup soy milk (or any nondairy milk, lukewarm)
- ½ cup warm water
- ¼ cup extra virgin olive oil
- 3 cups bread flour (360 grams. Measure with a scale or by gently scooping the flour into the cup measure and then leveling off. You might need a little more flour on a humid day.)
- 1¼ teaspoons salt (use less if on a low sodium diet)
Instructions
Make dough
- Mix the yeast and sugar in a large bowl or the bowl of a stand mixer. Add the warm soy milk, whisk to mix and set aside five minutes until the yeast froths.

- To the yeast and milk, add water and oil.

- Add 3 cups of bread flour and salt to the bowl. With your hand or a stand mixer set to medium low speed, mix the flour into the liquid mixture until a dough forms.

- Continue to knead for seven minutes. When you are done the dough should feel just slightly tacky and soft but it should clear the sides and bottom of the bowl. If the dough sticks to the bottom of the bowl, add more flour, a tablespoon at a time, until you have the right consistency.

First proof
- Form the dough into a smooth ball and place in an oiled bowl, turning over once to cover the top with oil. Cover the bowl tightly and set it aside in a warm spot, like a cold oven with the light turned on.

- After an hour, the dough should have doubled.

Shaping and second proof
- Turn out the dough on your work surface and gently deflate it. You should have a disc.

- Roll the dough, like you would a jelly roll, and place it seam side down. Fold the sides down and under the loaf.

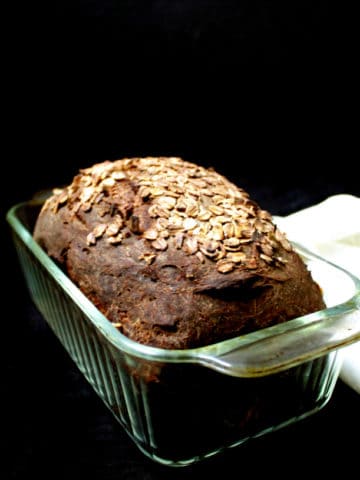
- Oil a 9 inch by 5 inch loaf pan (an 8-inch by 4 ½ inch pan is also fine, the loaf will dome higher). Place the loaf inside the pan.

- Cover the loaf loosely - a clean shower cap works very nicely for this. Set it aside in a warm spot to rise for another hour. After an hour the loaf should have risen and domed over the pan.

Bake bread
- About 10 minutes before you start baking the bread, preheat the oven to 350 degrees Fahrenheit/180 degrees Celsius. Place the loaf in the preheated oven and bake 35 minutes.

- Cool the bread on a rack for about 30 minutes, then unmold and continue cooling on the rack. Slice and serve after the bread has cooled thoroughly.
Nutrition Information
To print recipe card without images, uncheck "instruction images" after clicking the "print recipe" button.

My top tips
- If using active dry yeast, make sure you "bloom" it first in warm milk to check it's alive. I can't stress this enough - bad yeast is the main reason why dough will not rise.
- Use any non-dairy milk for this bread but if possible, lean toward soy milk. Soy milk has more protein than most non-dairy milks and the protein will give the bread a softer, finer crumb.
- Bread flour will give you the best results for this sandwich bread. If you don't have bread flour, you can use all-purpose flour (I did in my old recipe) but the bread won't rise as tall. You will also need to reduce the amount of water in the recipe to ¼ cup and add more if needed.
- Proof the bread dough in a warm spot. Even in summer, an air-conditioned home can get quite cool so don't leave it on the countertop and hope for the best. The optimal proofing temperature for bread dough is between 72 degrees and 78 degrees Fahrenheit (22 degrees to 26 degrees Celsius). I usually proof the bread in a cold oven with the oven light on.
- If you are a new baker, practice my three keys to baking bread successfully: precision, patience and practice. Make sure you measure your ingredients precisely (weigh them if possible) and follow directions for kneading, rise times and baking as written. Be patient and take time to knead and proof the bread for as long as instructed. Finally, practice. Don't expect your first loaf to be perfect, and don't expect to get better if you don't keep at it. My own journey to becoming a home bread baker was laced with pitfalls and disappointments. The only reason I can bake great bread today - and create recipes good enough to share with you - is because I didn't give up.
Frequently asked questions about making vegan sandwich bread
You can substitute some of the bread flour with whole wheat flour. I would use no more than 1 cup. If you're looking for a fantastic, wholegrain recipe you might want to try this rye bread.
I use olive oil - I think it adds great flavor to the bread and it's healthier. If you are worried you will taste the olive oil, you won't. You can also swap it out for another oil, including avocado oil, grape seed oil and sunflower oil.
Yes! Follow the instructions on your machine for making sandwich bread.
Store the bread at room temperature for up to two days and in the refrigerator for up to a week. Freeze in a freezer-safe bag for up to four months.

Recipe first posted July 12, 2009. Updated and re-published on August 1, 2025.


Brainless Housewife says
Can you use almond milk instead of soy? Thanks! 🙂
Vaishali says
Yes, almond milk would be perfectly fine.
shellybugster says
I made this recipe today and it was my very first venture into bread-making. I'm not much of a baker in general. This recipe is wonderful! It was easy to follow and understand, the bread smelled amazing while baking and it tasted wonderful when done. I used all-purpose flour instead of bread flour, but it still came out perfect. It was spongy and moist with a harder crust on the outside. Delicious! Thanks so much for the recipe 🙂
Amy says
Great recipe! My second attempt at making this turned out better than the first. First time I disregarded using oiled plastic wrap on last rise, and the towel I put over the loaves stuck to the dough and deflated the tops. The bread was still good, just a little squished.
Second time they were rounded and gorgeous, just crunchy as heck! The inside is lovely and soft, but the outer crust is very sharp.
Is it supposed to get that hard on the outside, or am I doing something wrong? I substituted coconut oil for the shortening, and I am using glass pans. Could the glass pans be causing the crunchiness? I do plan to get some metal pans for future bread baking.
Vaishali says
Amy, the glass pan could be making a difference because different surfaces impart different textures to the crust. Let me know if you see a difference with metal pans.
Vaishali says
Deepa, thank you for the feedback. So glad you liked the bread. 🙂
DR says
Hi Vaishali, I visit your site regularly but had not tried anything. Just tried this bread yesterday. It came out absolutely wonderful. Soft & Delicious. Great recipe. !!! One of the only recipes with Whole wheat flour that worked for me. Thanks much!
Deepa
Vaishali says
Hi AgnostiChica, thanks very much for the feedback and glad you liked the bread 🙂
I just made an all-whole-wheat version of this and it was really mindblowing-- the best bread I've made, I think. I'll be posting it this week so keep an eye out!
AgnostiChica says
Thanks for making my day, Vaishali. This is my first ever successful bread after half a dozen failed ones. DH is vegetarian and finding breads devoid of eggs here in Hong Kong is quite a trip. So this recipe is a godsent 🙂 I'm now off to trying some other breads from you!
Vaishali says
Hi Vanessa, glad you liked the bread and thanks for the feedback. And yes, I think you could definitely freeze it, then defrost and rise before baking. I've not tried freezing with this dough but I do often freeze pizza dough and it rises fine once it's thawed. 🙂
Vanessa says
This recipe is great!! I made it for the first time today, perfect!
I was wondering if it is possible to freeze the dough for baking later? It would be great to be able to make a few batches at once and save some for baking.
If it is possible, would one freeze the dough before the last rise, defrost it and let if rise in the pan after coming to room temperature?
Thanks for posting this recipe!!
Vaishali says
Anonymous, i usually scoop it out with the cup itself and then level off the top with a knife or my finger. You have to be flexible with the flour while bread-baking: a dry winter kitchen might require less flour, a humid summer kitchen would require more. Add enough flour so the dough does not stick to your fingers.
Anonymous says
This may sound like a silly question... how do you measure the flour? I'm used to spooning the flour (not sifted) into a measuring cup, as I did this when using a bread-maker. However, I had to use way more than the 1.5 cups of bread flour added at the last step. I'm wondering if my measuring technique is incorrect.
Finally...when you say to add flour until it is no longer sticky...do you mean absolutely no stick at all (probably another silly question)? Can you tell I'm new to this?
Thanks!!
Anonymous says
Hi Ms. Vaishali
I love baking and I was very happy when I found Holy Cow... what is the measurement if I use instant yeast? can't find dry yeast most of the time. Hope to hear from you and thank you very much.
Baketown
Vaishali says
Baketown, sorry I didn't see your message earlier-- I am not sure about how much instant yeast to substitute because I've never used it. I think you typically need less instant yeast, though, compared to active dry yeast. Some websites advise using 25 percent less instant yeast than the amount of active dry yeast in the recipe. Hope that helps.
Vaishali says
Anonymous, I guess you could substitute regular milk, although having never done it myself I cannot be sure about the result.
Anonymous says
By "regular milk", you mean almond milk, right?
Anonymous says
can you substitute regular milk for the soy milk?
Lavi says
Thanks Vaishali!! sorry for the late post also. Sandwich bread looks perfect!!
You have posted so many recipes in a week..got to catch up all..You Rock!!
Stephanie says
Your bread looks wonderful. I do have a recipe I use that makes 100% whole wheat sandwich bread that turns out really well, but I make part unbleached white and part whole wheat bread more often. I love to bake and this looks like a wonderful Sandwich Bread...the Earl would love it!!
Vaishali says
BangaloreBaker, thanks for a great tip!
Pavithra, feel free to write in any time.
Ann, thanks!
Pavani: I usually use a plastic bag-- bags leftover from storebought bread work great.
Pavithra, measuring ingredients is indeed key for baked goods. Good luck!
Dee, Thanks. Hope you try it some time, and I am looking forward to your IAVW entry.
Usha, Thanks!
Sharmila, it's always difficult the first few times, but as with most things, practice makes perfect!
Better luck next time 🙂
Madhuram, thanks! And I will definitely send it on to the wholegrain event.
Priya, thanks. You can replace the shortening with butter.
Maria: Glad it turned out well for you. I should've mentioned that one should add more flour if the dough's still sticky. Thanks for letting me know, and I will add a clarification in the recipe.
Anonymous says
Hi Vaishali, I was looking for a good recipe for sandwich bread and now I have it 🙂 I made your recipe yesterday and it came out really nice, soft and very tasty. I needed to add though more than 2 cups of bread flour before the dough was not sticky anymore; you had on the instructions up to 1.5 cups, so I was a bit worried of the final result; but later when it started rising beautifully I knew it would be good.
Really excellent recipe. Thank you 🙂
Best wishes.
Maria
Priya Narasimhan says
Vaishali, can't believe it is homemade. It looks so good..And thanks for the tips..What exactly is this shortening? Can I replace it with butter if I don't mind if it is not vegan...
Madhuram says
I too have not overcome my fear of yeast after one failed experiment. So great tips for people like me.
Could you also send it to the whole grain event when time permits?
Sharmila says
Wow! this post is so informative Vaishali. I did try to bake with whole wheat ... and it did turn into a strange looking solid mass. am going to refer this post the next time I try to bake. 🙂 the bread looks great ... wish I can bake some bread successfully someday.
Usha says
Absolutely gorgeous bread, Vaishali!
Dee says
I dont even get close to thinking about bread baking vaishali. Great tips for a novice like me . I thoroughly enjoyed reading the post. bookmarked for future use:) I hope to participate in the IAVW_ british event. Lets see how it goes...
Pavithra Kodical says
I agree i was doing that mistake before. I was not measuring the ingredients and the bread use to be dense.Now i make sure to measure all the ingredients and happy with the result.
Pavani says
I've never baked bread, but I would love to. How do you store your bread in the fridge? wrapped in foil? Nice pics and great tips too.
Ann says
Agree with you completely there..Fresh home baked bread is nowhere near comparison with the store brought..I bake often..
yours look perfect..texture tell it all !!
Pavithra says
Vaishali thats really usful tips u have given.. I have never tried baking a bread..But having in mind will mail you if i have any doubts other than this... Your looking so good and perfect and really tempting me to do it...
BangaloreBaker says
Just a tip. If you want to use all purpose flour instead of bread flour (which I do all the time since all purpose is cheaper when bought in bulk than bread flour and bread flour can't be bought in bulk in stores), add a TBSP of vital wheat gluten for every cup of flour. You might have to add 1/2 - 1 tsp extra water , but the results are same as bread flour bread. While making wheat bread, it helps if you double the first kneading cycle's time.
Vaishali says
Hi Pooja, You could substitute all-purpose flour in the recipe, although keep in mind that all-purpose flour has a lower gluten content than bread flour as well as less protein, so the bread's texture would turn out different. It might not be as spongy and chewy.
Pooja says
Wow the sandwich bread looks spongy and soft! Thanks for the tips. It would be very useful. Does all purpose flour work as well instead of bread flour?