

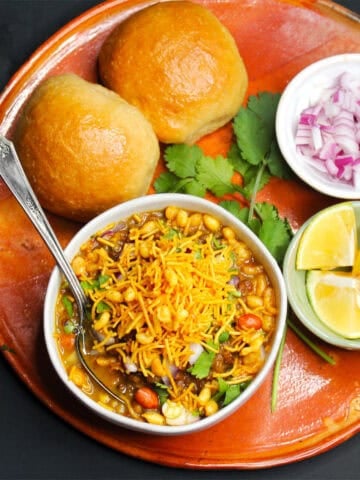
When my friend Seema and I ate out in Mumbai, our first choice was always pav bhaji. This quintessential Mumbai street food arrived at the table in a grand flourish of butter melting over a hot, tangy mishmash of vegetables (bhaji) with a side of chopped onions, wedges of lemon, and toasted, pillowy bread rolls (pav) oozing with more butter. Our mouths would be watering well before we could scoop up the bhaji with the pav for that first, divine bite!

Table of Contents
What is pav bhaji?
Pav bhaji translates from Marathi, the language spoken by Mumbai natives, to "bread and vegetables," and it is what it sounds like: a mashed vegetable curry, fiery-red but not too spicy, served with toasted bread rolls, called pav.
This is a street food native to Mumbai, India's largest megalopolis and the city where I was born, and it holds a special place in my heart. I can't go a month without eating pav bhaji, and every time I do it reminds me just why I love it so.
Mumbai is famous for its street food, which includes such delightful - and often vegan - offerings like misal pav, ragda pattice and vada pav. These dishes sprung up decades ago in food carts outside the city's now defunct textile mills to feed the workers' need for cheap, convenient and quickly served eats during the workday and especially at lunch.
Vendors borrowed elements of home cooking from the different Indian communities that had made the city their home, took what was easily available but not easily spoilt, and threw it all on screeching-hot, three-foot-wide griddles, called tavas, with generous dollops of butter and spice. With their steel spatulas going clackety-clack, they mixed up the ingredients into food that was incredibly delicious and even healthy (but perhaps not remotely hygienic).
Restaurants were quick to cash in on the extreme popularity of foods like pav bhaji by introducing their own versions that you could eat in more sanitized surroundings. In my day a restaurant in south Mumbai, Kailash Parbat, was especially popular among pav bhaji gourmets and the last time we were in the city my son, Jay, just as avid a street foodie as I, made sure we stopped at the restaurant for a plate of pav bhaji. As good as it was, I can honestly say I've never met a plate of pav bhaji anywhere that I didn't like. You can find decent versions at some Indian restaurants in the United States (including a Kailash Parbat branch in NYC!).
The allure of pav bhaji comes from the myriad layers of flavor created by the vegetables, spices, cilantro, raw onions, bread and, of course, the butter, which smooths and rounds them all out. It might sound complex but in fact pav bhaji couldn't be easier to make. To make the bhaji you cook the vegetables and the spices together, then mash them up into a thick curry. You don't need a bunch of spices either - just a pre-made mix called pav bhaji masala, and I have a recipe for you that is ready in 10 minutes. You can also buy pav bhaji masala online or at the Indian store, but like all spice mixes it tastes best when you make your own.
The pav is a very simple bread roll and I have shared a fantastic recipe for authentic pav, which you can use with so many street food dishes. But you can also use any soft dinner roll. The pav for pav bhaji is always toasted with butter and I will have more for you on how to do that in the recipe card below.
When you squeeze the lemon over the bhaji and scoop it with the pav make sure you get in a bit of everything, including the raw onions and cilantro. Then, as you take that first bite of this fabled street dish, imagine yourself by the beach in one of the world's greatest cities, the gritty sand under your feet, the salty breeze in your hair, and the sound of 20 million voices in your ears.
This is absolutely addictive... So yummy and just enough spice...thank you for another wonderful recipe...I made your pao recipe and had this with it. A definite make again🤤
- Tanya
Recipe card

Pav Bhaji
Ingredients
For the bhaji:
- 1 tablespoon oil
- 1 large onion (finely chopped)
- 1 heaping tablespoon ginger garlic paste (if you don't have the ginger garlic paste, make it by crushing together a 1-inch knob of ginger and six garlic cloves)
- 4 medium tomatoes (finely chopped)
- 1 cup frozen green peas (If using fresh green peas, cook them first until soft)
- 2 large potatoes (boiled, peeled, and coarsely mashed or grated)
- ½ large head cauliflower (about 3 cups grated. You can use cauliflower rice as well)
- 1 large carrot (grated)
- 1 green bell pepper (seeded and finely chopped)
- 2-3 heaping tablespoons pav bhaji masala
- 1 teaspoon paprika (or Kashmiri chili powder, optional, mainly for color)
- Salt to taste
- 2 tablespoons vegan butter
For serving:
- 12 pav
- 1 red onion (finely chopped)
- ¼ cup cilantro (finely chopped)
- 3 tablespoons vegan butter (¼ teaspoon per serving. You can always add more if you want to)
- Wedges of lemon
Instructions
- Heat the oil in a wide skillet or pot over medium high heat. Add the onions and sauté until soft and translucent but not browned. Add the ginger-garlic paste and continue to sauté another minute.

- Add the tomatoes and cook over high heat until they begin to darken.
- Add in the grated cauliflower, peas, potatoes, grated carrots and bell peppers.
- Add two cups water and mix. Cover and cook for 10 minutes or until the veggies are very soft. Make sure the cauliflower and carrots have cooked completely.
- Stir in the pav bhaji masala. You can also add some paprika at this point for more color (street vendors often use food color for that bright red color).
- Turn down the heat. Using a potato masher, mash the veggies until most of them are broken down and you can't recognize the individual vegetables, with the exception of some peas, which can be notoriously hard to mash. Do this carefully because the bhaji is thick and will bubble and splatter as you mash it.
- Taste the pav bhaji and add more pav bhaji masala if needed. Add salt to taste.
- Add the two tablespoons of vegan butter and continue to "fry" the bhaji until it is very thick and has a glossy sheen on top. This should take 2-3 minutes. Turn off the heat.


How to serve and eat pav bhaji
- Toast pav: Heat a griddle or skillet until very hot. Put a pat of vegan butter on it and sprinkle a bit of pav bhaji masala. Slit a pav roll down the middle with a knife, but leave it connected at the spine, like an open book. Place it, open-side-down on the hot skillet. Toast the pav until golden-brown.
- Serve pav bhaji: Place two toasted pav rolls in a plate and ladle some bhaji into the plate. Add a square of vegan butter to the bhaji. The bhaji should be hot enough that the butter begins to melt right away. Sprinkle onions and cilantro over the bhaji and serve more onions and cilantro on the side along with lemon wedges.
- Eat: Before you eat, swirl the butter into the bhaji. Tear off a piece of the pav and scoop up the bhaji, onions and cilantro in one bite! Spoons and forks are a no-no. Even Desi, who can barely eat roti without a knife and fork, uses his fingers to eat pav bhaji. There just is no other way to enjoy it.
- Finally, no Bombay street food is complete without a cup of chai, so pour yourself a glass of vegan cutting chai to wash down the pav bhaji.
Notes
Nutrition Information
To print recipe card without images, uncheck "instruction images" after clicking the "print recipe" button.

My top tips for the best pav bhaji
- Cut the vegetables in a small dice. The smaller you dice the veggies now the easier it will be to mash them later.
- When you mash the veggies, leave in some texture. The individual veggies shouldn't be recognizable, but you don't want a paste either.
- Make sure you use all of these vegetables for the most authentic tasting bhaji: onions, tomatoes, potatoes, peas, green bell peppers and cauliflower. I also add carrots for more flavor and nutrition but they are optional.
- Use green bell peppers. Green, not yellow, red or orange bell peppers. Green bell peppers have a savory flavor that works best in Indian restaurant style dishes like pav bhaji and tofu tikka masala.
- If you don't want to grate cauliflower, use riced cauliflower.
- Add as much of the pav bhaji masala as you need to. If you taste the bhaji right after you've added the masala you might think it tastes strong, but wait until you've mashed the veggies and taste again because you might need more.
- Don't forget to serve raw, chopped onions and lemon with pav bhaji. These are not optional ingredients. They are critical for the final flavor you will taste when you take a bite.
Pav bhaji FAQs
Yes! My pav roll recipe can easily be made whole wheat by substituting all or some of the all-purpose flour with whole wheat flour. If possible, add a couple of tablespoons of vital wheat gluten for softer, lighter rolls.
You can serve it as either. It makes a great after-school snack but I serve it as a main meal, usually for dinner.
No. The butter is critical for smoothing out that mad mix of flavors in a pav bhaji, so please don't skip it. Keep in mind that this is otherwise a very healthy dish, and it's far healthier than anything you can buy at a restaurant.
Both the Everest and Badshah brand pav bhaji masalas are popular among Indian street food lovers and they will reward you with a fine tasting pav bhaji. But I strongly recommend making your own pav bhaji masala, both for the best flavor and for safety. You can read more on why I choose not to buy pre-made spice blends in my pav bhaji masala recipe post.
Pav bhaji masala is critical for adding authentic flavor to pav bhaji. I can't stop you from substituting it with garam masala but I would not recommend it because you won't get the true flavor of pav bhaji in your preparation.
Recipe first published June 20, 2009. Updated and re-published on Jan. 29, 2026.


Vijaya swaminathan says
Lovely to get vegetarian recipes
Vaishali Honawar says
Hi Michele, I am sorry to hear you didn't like the recipe, but it sounds like a matter of taste. Pav bhaji is meant to be a mash and it definitely won't taste good if you leave vegetables whole. I am also not sure why you tasted the black pepper and red chilies alone because there are only 10 peppercorns in the entire masala recipe, and you are only meant to use three tablespoons of the masala powder, or less, per your taste. The red chili peppers, as I specify in the recipe, can be reduced if you don't love heat. Finally, pav bhaji is not meant to be like other curries or dals you get at Indian restaurants here. It is a very distinctive dish and very much loved in India.
Tanya says
This is absolutely addictive... So yummy and just enough spice...thank you for another wonderful recipe...I made your pao recipe and had this with it. A definite make again🤤
Vaishali says
Yay!! So awesome to hear that. 😍
Santhoshi Shanmuga says
Hi can sour dough discard be used to make the pav???
You are such amazing recipes thankyou so much...
Vaishali says
Hi Santhoshi, absolutely, you can add a cup of recently fed sourdough discard. Make sure you do one overnight rise.
Emma Hurson says
What do you use the dried active yeast for
DH says
10 million years ago ('89-90) I was a high school exchange student in Jalgaon Maharashtra. My host mother actually made pav bhaji, sometimes with store bought pav, sometimes with homemade poori. Somewhere, I have a carefully written recipe in Marathi (I learned how to read & write it) with english translation.
Right before this current pandemic situation, I vowed to start making it at homebut never got a chance to pop over to Jackson Heights to get the masala!!
This may very well be the first thing I make as soon as I get a chance...
Vaishali says
Hi DH, I'm amazed that you learned to read and write Marathi! Thanks for sharing your beautiful memory, it brought a smile to my face. I hope you will make this someday and hope it brings back more good memories. 🙂
Suzanne says
Hi VAISHALI,
I recently signed up to your website as your recipes look fantastic. Today's Pav Bhaji sounds great. I saw you say the green peppers are a must to be authentic. I see also that many of your recipes have bell peppers in them. Unfortunately I can't eat bell peppers can you recommend a suitable substitute?
Sincerely,
Suzanne
Vaishali says
Hi Suzanne, if you can't eat bell peppers leave them out. You can just add more green peas.
Anonymous says
Enjoyed eating the fresh Pav and bhaji at your place. It was outstanding. Now that I have the recipe I will try to make. Niru
Vaishali says
Niru, it was so good to see you and Badri again after so long. Glad you enjoyed the pav-bhaji!
nivi says
Hi Vaishali,
I was browsing to check for vegan cupcake recipes and stumbled upon your website. First it was the cupcake recipe, then it was the adventures of Opie and now the nostalgia of Mumbai. I worked in Nariman Point too, and all the yummy food, chilling out at Marine Drive and the funny things you have written about Mumbai, makes me want to reach to you. Thanks so much for your recipes and also your funny style of making things come alive. Love to Opie and the other members of family.
Cheers,
Nivedita
Vaishali says
Nivedita, welcome to the blog and thanks for your kind words! Good to meet another Bombayite. Opie sends a big tail-wag. 🙂
Usha says
I am with you on not having had a pav bhaji on the streets of Mumbai that I disliked...having said that this one looks like a real winner 🙂
Ashwini says
never tried making pavs at home.. u did it like a pro...
Priya says
Vegan pav looks delicious...my all time favourite, just love ur vegan version Vaishali!
Miri says
Gosh - we must have worked in Nariman Point around the same time...:)
Our fav haunt was the corner place -half covered and half on the pavement - at the end of the last road which led to Colaba and Mantralaya. The pav bhaji and the milkshakes were absolutely awesome!
On our CA stipends we use to pig out! not possible anywhere else but in Mumbai!
And did you ever visit Khau galli - the street which fell somewhere between VT and Churchgate near Oval Maidan?
The pav bhaji looks yummy!
Poornima Nair says
God I loved reading your post...bought back such fond memories of Mumbai...My office was at Colaba and we were regulars at marine drive especially during the rains to have the bhutta and I love Kailash Purbat...I love the way u've described everything.
Pav bhaji looks awesome, that home made pav is just perfect.
Vaishali says
Pavani, Mihl, Thanks.
Meera, thanks for reminding me. I'll definitely be sending it.
Pradeep, of course! Thanks for reminding me. Golden Gate it was.
Jaya, That's some coincidence. I worked in the TOI building too for five years-- just a floor above Femina, at the Independent that then turned into Bombay Times. How nice to meet you finally in blog world! 🙂
I remember the Canon pav bhaji stand-- we often wandered out there for some great eats.
Vaidehi, thank YOU for the great recipe. I'll be making this pav often!
Sharmila, Happy, Parita: Thanks ladies.
Red Chillies: Thanks. Yeah, some versions do use a lot of butter, although that little dollop at the end is more than sufficient. I used vegan butter and it tasted just the same.
Bindiya, Thanks!
bindiya says
loved the way you described bombay with such intensity and ur love for pav bhaji really shows thru!
Red Chillies says
I liked your vegan version of the Bhaji. The asli bhaji is loaded with butter isn't it?
Also liked the idea of using soy milk in the pav.
Parita says
OMG brought back lots of memories..pav bhaji looks heavenly m craving for this right now!!!
Happy cook says
Last time i had pav baji was when we wer ein Mumbai. I have never made them home . I would love to grab tha tplate from my screen.
Sharmila says
Your write up was too good ... and definitely whetted my apetite for a spicy plateful right now. Sunday brunch is going to be this I think. 🙂
Thanks so much for the pav recipe .. would like to try it sometime.
Vaidehi says
thanks vaishali...glad to hear that you enjoyed it. Your Pavbhaji looks amazing..
Jaya Wagle says
I also forgot to mention I too have been to the salad bar restaurant. Our editor took us there once for a staff lunch. The salads and the breads were out of this world.
You have brought back all my good memories of Mumbai and the street foods i used to enjoy.
Jaya Wagle says
Oh my god Vaishali,
First I have to mention the Canon pav bhaji stand near VT station, just behind the TOI building. Where, incidentally I was an intern at Femina for a couple of months. I joined IE Screen as a reporter-editor right after that. Our offices were a cluter of cubes in a corner of the fifth floor (I think) which was housed in the Express Building, in Nariman Point! How incidental is that?
Also, thanks for visiting my blog and leaving your nice comment. Appreciate it. 🙂
Meera says
Felt very nostalgic!! Hope you are sending it to RCI -Mumbai Street Food.
Mihl says
Awesome, I think I can get that kind of masala in my local Indian store.
I always look forward not only to your recipes but also to your great stories and descriptions, thank you for sharing this.
Pavani says
Home made Pav sounds delicious. Bhaji looks scrumptious Vaishali.. Nice pics.. Have a great weekend.
Pradeep Bonde says
"There was a new restaurant with a great salad bar we sometimes went to whose name I forget but which was en route to the Regal Cinema."
That was Golden Gate
I believe it has closed down now.