

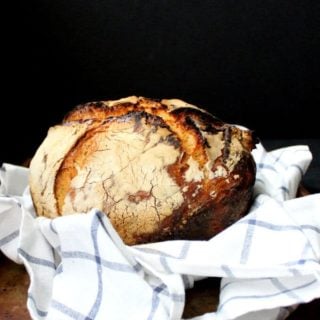
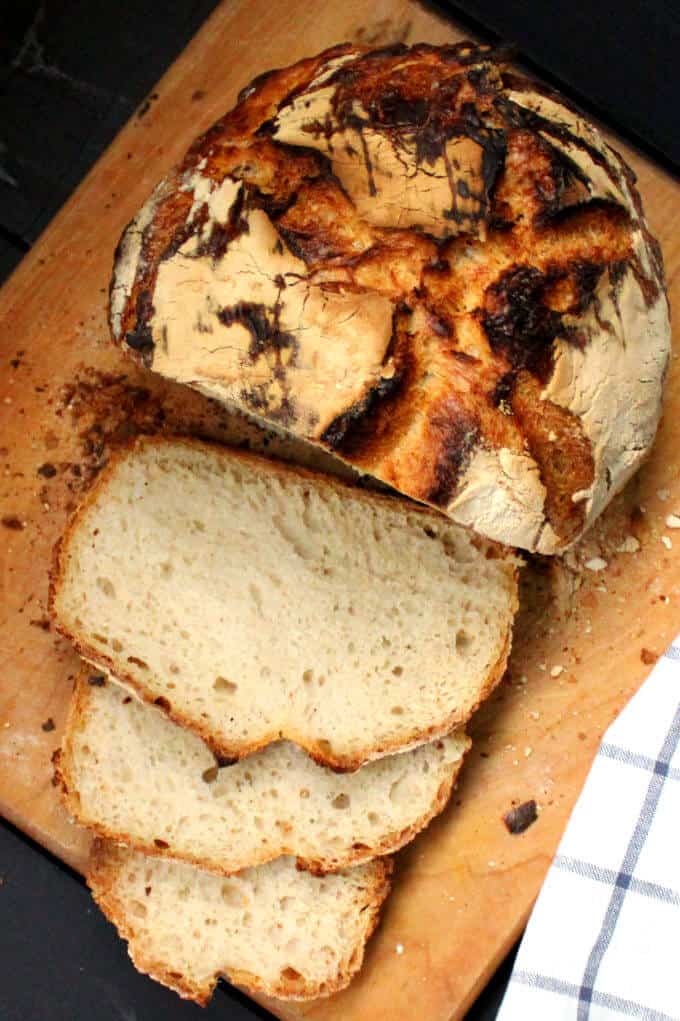
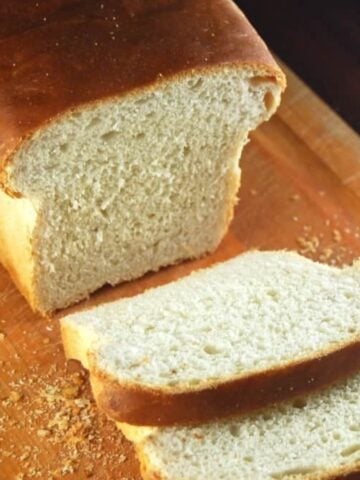
An artisanal loaf of No Knead Sourdough Bread that takes almost no skill and minimal amount of hands-on time. If you love making sourdough breads, this is one you absolutely want to try! All you need for this recipe is two ingredients -- a quality sourdough starter and flour. The bread is crusty with a tender, airy crumb and a delicious flavor.
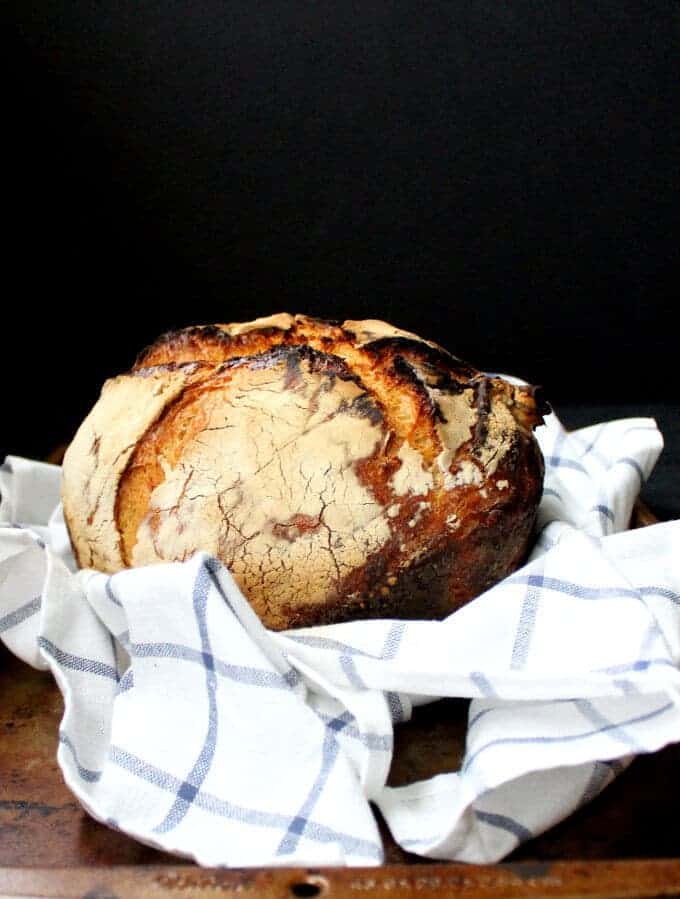
Table of Contents
No-knead sourdough bread
If making bread seems like a lot of work, I have for you the perfect solution: my no knead sourdough bread recipe.
This is really one of my favorite bread recipes, and one everyone in my home loves. It was my son Jay's favorite bread. He loved eating it fresh and once it was a day old, I'd toast it up for him and he loved it even more. With a dab of vegan butter, this bread is heaven itself.
I started out with a recipe from Sam Sifton, but over the weeks I've tried different versions of it, including a part whole-wheat one that is ridiculously good, although not as airy as the version made entirely with white bread flour. It does pack in a ton of flavor, though. But you can rest easy even with this recipe, which uses white bread flour, because the probiotic microflora in the sourdough slow down the rate at which glucose is released into the blood-stream, making sourdough bread -- yeah even white sourdough bread -- rank lower on the glycemic index.
The best part about making this bread is, I don't even need to refer back to the recipe. The ingredients couldn't be simpler or more basic and therefore easy to remember. The only real work is mixing up the ingredients, but you can do it all in one bowl and set it aside to rise. You do need some time for the sourdough to do its magic, but it's all hands-off time and some things are worth waiting for, aren't they?
The dough needs two rises. One is a longer, overnight rise, and the second is a shorter, two-hour rise. You will need a dutch oven or a heavy, oven-safe pot with a lid to bake the bread. My dutch oven is not enameled on the inside, but it works just great. You will also need some parchment paper or a kitchen towel for the second rise, with parchment a much better option.
I hope you will try this loaf and if you do, I know you'll love it. Just be sure to follow instructions (I am usually not a stickler for following recipe instructions, and I don't usually ask that you do that with my recipes -- except when you're baking breads and desserts). That way you can rest assured you get perfect, foolproof results.
Now for the no knead sourdough bread recipe. Happy baking!
OMG, my first loaf and so easy! It worked! The crust is like a bakery bread. I'll make it again. Thanks. - Janice.
Recipe card
No Knead Sourdough Bread
Ingredients
- ¾ cup sourdough starter (unfed is fine, but it should have been fed at least within a week of baking the bread)
- 1 ¼ cups water (use distilled or non-chlorinated water for bread, especially sourdough breads)
- 3 ½ cups bread flour (can replace 1 cup of the bread flour with whole wheat flour. The bread will be less airy but still delicious)
- 1 teaspoon salt
Instructions
- In a large bowl, mix the sourdough starter with the water, then add the flour and salt and mix until a consistent but sticky dough forms. You can do this by hand or in your stand mixer.
- Cover the bowl with cling wrap and let the dough rise overnight or 8-10 hours.
- Turn the risen dough onto the kitchen counter and form it into a ball as best as you can. If the dough is hard to handle, flour your hands but resist the temptation to add more flour. You want a dough with higher hydration or water content for a light, airy loaf. Adding too much flour will make your bread dense. Even if your dough doesn't form into a perfect loaf, it will shape up nicely during baking in the dutch oven.
- Prepare a sheet of parchment paper by sprinkling liberally with flour. If you don't have parchment, you can use a kitchen towel sprinkled with flour, but keep in mind that there is a much higher chance of your dough deflating when it rises on a kitchen towel because it will more likely stick to the towel. Place the parchment paper or kitchen towel on a baking sheet.
- Transfer the dough onto the parchment paper or kitchen towel, seam side down. Cover (I use the bowl I mixed the dough in), and let it rise another two hours.
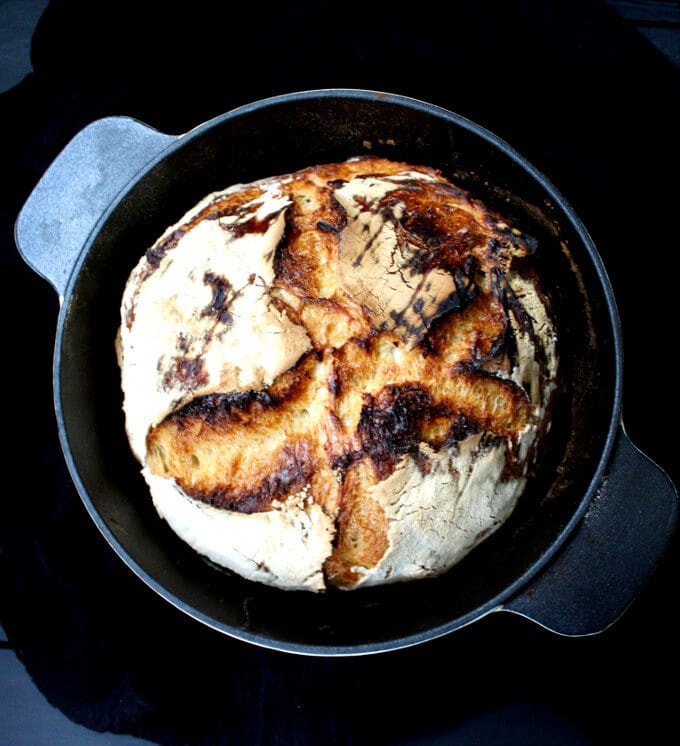
- About half an hour before your bread is done rising for the second time, preheat the oven to 500 degrees. Place a heavy cast-iron or other oven-safe pot in the oven with the lid on. (I use a 3.2 quart dutch oven that is not enameled on the inside. Enameled is even better.)
- Once the dough has risen, carefully remove your heated pot from the oven. Quickly, in a smooth motion, turn the dough into the pot so that the seam side now faces up. A parchment paper makes this much easier because the dough slides off more smoothly. Be very careful doing all this because the pot is very hot. If you find turning the bread into the dutch oven difficult to do without deflating it, you can just transfer the bread into the dutch oven with the parchment paper (don't do this if you used a kitchen towel).
- Put the lid back on the pot and bake for 30 minutes. Take off the lid and continue baking the bread for another 20 minutes. The bread will split at the top and char a little, which I love because the charring adds even more flavor.
- Once the loaf is baked, remove to a rack and let it cool about half an hour before carefully removing it from the pot. Let the loaf continue cooling on a rack. Slice and serve, or tear it apart with your bare hands (which you just might want to do because who has time for niceties when there's a delicious loaf of bread to be eaten 😉 ).
Notes
Nutrition Information
To print recipe card without images, uncheck "instruction images" after clicking the "print recipe" button.
Recipe FAQs
There can be a number of causes why the bread dough did not rise. These are the most common:
-You used a weak or inactive starter. Make sure that the starter is active - it bubbles and rises within hours of feeding. And if you used sourdough discard, it should have been fed no more than a week back, and should have bubbled and doubled after being fed.
-The dough was not proofed in a warm spot. Sourdough bread dough needs to be at a temperature between 75 and 82 degrees Fahrenheit in order to rise.
-You used a starter with a very high hydration so the dough was too wet, which would cause the gluten to collapse.
-You deflated the bread dough when you turned it into the heated Dutch oven. You can avoid doing this by placing the loaf, including the parchment paper, in the Dutch oven.
You can, but bread flour has more gluten and will give you a higher bread.
The cast iron heats the bread dough evenly and it also traps steam, yielding that wonderful, crusty crumb.
Yes, you can use a cast iron skillet, a glass or metal baking pan, or even a baking sheet dusted with corn meal. Because the dough is loose it may spread more in a baking pan or on a baking sheet, giving you a flatter bread, but it should still have the great crumb. To make the bread crustier, place a small baking pan filled with water on the bottom rack of the oven when you begin to preheat it.
Absolutely. Wrap it in freezer-safe wrap or freeze in a freezer-safe container for up to four months. Thaw completely and warm in oven before slicing and serving.


Joe says
Hello Vaishali - Me again, with another question/comment. I absolutely love this recipe, both for ease in making and delicious flavor. I've had much success, multiple times, with the results being as pictured and described. However, the last 3 times I'm making this, my loaf of bread 'falls' in the center and doesn't rise like it had been doing before. The taste is still great, but it's a bit denser (and not nearly as beautiful a loaf of bread.) Any ideas? The overnight rising height and consistency still looks comparable to when it 'worked' in the past. I've done less tension and more tension when pulling the ball of dough together, but still the last 3 times have not been a huge success. Thanks for any insight.
Joe says
I love, love, love this bread - thank you, again. Although I should have the recipe measurements memorized at this point, I always come back to this site for the recipe. That said, I think there's a glitch when clicking on 'Metric' measurements. The measurements don't convert as they did before, and now the webpage refreshes without change. I can approximate it by conversion, but I loved that feature. Thanks so much.
Joe says
You can disregard my comment about the metric measurement not working. Within minutes - it works! It seemed 'stuck' for more than a week, but now it works. Thanks!
Vaishali says
Awesome, so happy you've loved the bread and that the measurements glitch worked itself out. Thanks for letting me know.
Melissa says
I am trying this recipe after making my starter. I think I may have messed up, however, in feeding my starter after removing 3/4 cup of it for the recipe.
I added 3/4 cup flour + 4 oz water to my starter but that doesn't seem right. How can I make it right, and should I always remove at least a cup of starter to keep the flour to water proportions exact?
I'd hate to have to do my starter all over 🙁
Vaishali says
Hi Melissa, you can't mess up your starter--it's really hard to do that. 🙂 If you messed up the proportions, just continue the next time by feeding in the right proportions: 4 parts flour and 3 parts water by volume. You might need to tweak the water proportions in recipes you make next slightly up or down, but otherwise you should be fine. You can't always just take out 1/2 cup because different recipes call for different amounts of sourdough starter.
Melissa says
Thanks! The bread was delicious and my husband was super happy! Made some yummy grilled cheese sandwiches with it.
Is there a way to minimize the overly done bottom? I ended up scraping most of it off with a knife but that was messy.
I love Indian food, so I look forward to some of your other recipes as well. Appreciate you sharing them 🙂
Meechum says
I find it very difficult to get the finished bread out of the Dutch oven. It always sticks to the bottom of the pan. Can I use the parchment paper in the Dutch oven? In other words the dough would not make contact with the bottom of the pan but instead would be on the parchment paper inside the pan so easier to extract when done?
Thanks and apologies if you have already answered this question
Vaishali says
Hi, yes, absolutely. You can place the loaf with the parchment in the dutch oven and bake. I'd cut out any overhanging parchment that sticks out of the pan.
Jen says
Posting this twice because I accidentally entered my email incorrectly!
I’ve been making this bread each week for the past few weeks and I’ve been loving it! However the portion is too large for me to finish each week, I’ve been freezing half of it and was wondering if you’ve ever made half the serving successfully, and if so, what the measurements are?
I also wanted to know if you’ve ever added herbs or cranberries and walnuts/almonds, and if so, how much you added?
Thank you!!
Vaishali says
Hi Jen, I aswered your other question above. To add herbs, cranberries and nuts, use this sourdough sage and olive loaf as the base recipe and add the nuts and other ingredients you want to instead of the sage and olives. https://holycowvegan.net/sourdough-olive-sage-loaf/
Jen says
Thank you so much for the quick reply! I’ll check out this recipe 🙂
Jen says
Thank you for this recipe! I’ve been making it for the past few weeks and have been loving it but recently tried to half the recipe as it’s too much for me to finish each week. However when I try to half it, the dough is too dry and will not rise. Have you ever successfully made half the quantity, and if so, what were the measurements?
Vaishali says
Hi Jen, I haven't halved the recipe myself, but the only adjustment you should need is to the baking time. Halving the recipe--if you also halve all the ingredients proportionately--should not affect the rise.
Here are some thoughts. Are you halving the water as well? If the dough is looking too dry, it could just be because of changing weather, which can definitely be a factor. Try adding a little extra water until you get the texture you are used to when you make the full recipe.
Jen says
Thank you so much! It was a lot colder when I let it rise last night so I think that’s what it was. I’ll keep playing with it!
Kathryn James says
I've tried several sourdough recipes but keep coming back to this one as it is just so simple and makes a perfect loaf every time! The sticky dough took some getting used to but I think I've mastered it now by wetting my hands and working quickly. My house smells of delicious warm bread - I can't wait to break into it.
Joe says
Thank you, Vaishali. This bread recipe could not be easier - and the bread is incredibly delicious. Since finding this recipe somewhere around a couple of weeks ago, I'm on my 5th loaf, at least! Love the char and the incredibly chewy crust. I literally have to hold myself back once I cut (or tear) into it! Thanks again.
Vaishali says
So great to hear you’ve enjoyed it! I am pretty crazy about this bread too. ?
Leslie Jill Shai says
Hello Vaishali,
Thank you for educating all of us! Once l have an established starter, can this recipe be naked in my breadmaker? I would really like to benefit from the lower glycemic index of sourdough, and l don't mind a denser loaf if l can incorporate some whole grain in the recipe. Us it possible for the rise time, with the machine's temperature optimization, to be sufficient?
Then you for your help ?.
Joe says
Hi Vaishali. As noted in other comments, your willingness to reply to questions is greatly appreciated. (I asked a question yesterday in the sourdough dinner rolls recipe and I'm ready to bake those beauties today!) I've been baking sourdough bread since April (along with half the rest of the world,) using active starter and a more typical process of stretch/fold, rest, repeat. I'm really looking forward to trying this recipe soon. Two questions: For the final 2-hour rise, what do you think about using a bread proofing basket since I have a couple of them, then turning it out onto parchment for the baking? (Or maybe placing the parchment in the proofing basket to help the dough hold its shape, then transfer with parchment to the dutch oven for baking?) Any tips on making a cinnamon, nut, raisin loaf? Thanks again for your kindness.
Vaishali says
Hi Joe, it would be a good idea to place the parchment in the proofing basket, as the dough is very wet and might stick to the basket if you place it in directly. Using parchment would also make it much easier to lift the dough and place it in the dutch oven. If you do try it without the parchment paper, be sure to flour the proofing basket very thoroughly.
I haven't made a cinnamon nut raisin loaf but I do have a sourdough olive and sage loaf recipe on the blog that you can use as a guide for various fillings. https://holycowvegan.net/sourdough-olive-sage-loaf/
Always happy to answer questions. 🙂
Joe says
Thanks. Dinner rolls out of the oven and they are perfect! Making the sourdough bread tonight! Thanks again. Cheers!
Barbi E says
I read EVERY comment 'carefully' first ! This is 'key' to understanding how to problem solve, or even perhaps avoid a 're-do' bake session.
Thank you Vaishali for your continued PATIENCE in answering the many repeat questions. That has helped me tremendously ! What a beautiful quality for a 'seasoned baker' to have when sharing the 'JOY of baking bread!' Thank YOU so very much.
Vaishali says
Thanks for the kind words, Barbi! I love getting the questions and answering them. So happy you took the time to read all the comments. 🙂
Georgie says
Hello! May I know could you please insert photo of how the dough will look like?
I tried to make it once but the dough is very runny may I know if its normal? Thank you!
Vaishali says
The dough will be fairly runny, that's why you bake it in a dutch oven, so it forms and holds a shape. It could also be that your sourdough starter has a different water-flour ration than mine, or it could be that you are in more humid weather. Reduce the water by 1/4 cup in that case.
nancy pope says
why can't you use active sourdough starter? What would happen if you do?
Vaishali says
You can use active starter no problem
Kyerra says
Hi! I'm starting my own sourdough for the first time and want to try out this lovely bread, however, I don't have a dutch oven (I'm a student with low budget:)). Could I use a regular cake pan instead? Do you have any tips for this? Thank you!
Vaishali says
Yes, and tent with aluminum foil instead of lid. Give room for the bread to rise.
Sarah says
Hello, when you say “unfed starter”, how long should it have been since the last feeding? A day? A week?
Vaishali says
Up to a week!
Phoebe says
I love this easy recipe which I first made today when the humidity was quite high. The dough was too moist to shape and had little rise. I did some research regarding moisture levels in dough on humid days and found the suggestion to reduce the water content by 10%. Will try this next bake. In spite of its low rise, the bread is beautiful and delicious! Thanks.
Robin says
Should we add more water if we're using a cup of whole wheat flour? How much more? My dough is a lot drier with the whole wheat flour added.
Vaishali says
If it's in dough form without any dry flour that can't incorporate just leave it as is.
Robin says
If I have to leave the dough for longer than 10 hours overnight, say 16 hours or so, should I leave the dough in the fridge, or will it still be OK on the counter?
Vaishali says
In the fridge.
Robin says
Thank you. Baked yesterday with my new starter and it turned out amazing! So easy, I'll be making this recipe many many times I'm sure.
Davina says
Is it possible to throw any ingredients / flavours in between the rises?
Vaishali says
Yes! See this olive sage sourdough loaf for ideas. https://holycowvegan.net/sourdough-olive-sage-loaf/
Jessica says
What would I substitute to make this bread gf ? Would all purpose flour or brown rice flour work?
Vaishali says
Hi Jessica, I have a gf sourdough boule recipe here: https://holycowvegan.net/gluten-free-sourdough-boule/
Julie says
Hello,
I just tried this recipe for the first time. When I tried to shape my dough and let it rise for another hour, it sort of "ran away" and was super sticky. Could you tell me how to get it so it stays in place better? Also, do you have any tricks to deal with the stickiness?
Thank you!
Vaishali says
The dough will be sticky, but if it's very humid where you are, it could make the dough stickier. In that case let it rise slower, for a longer time, in the refrigerator or a cool basement. As for shaping, since you'll be baking in a dutch oven the dough will shape into a boule by itself, you don't really have to worry about that aspect.
Angie says
I have made this recipe weekly for the past 3 months and love it! But I was wondering if you have any recommendations on how to adjust the recipe now that it’s becoming summer where I live, and we’ve had some very hot and humid days? I let the dough rise overnight for 10 hours, but this morning it was way too sticky to even work with and this hasn’t happened to me before- I assume it’s because of the increased humidity in the air. Perhaps I should let it rise in the fridge or in a cooler place, like our (finished) basement?
Vaishali says
Your basement sounds perfect. Sourdough does get stickier because of the humdity!
Krithika says
So I don't have a Dutch oven or any dish with a lid that could go in the oven. Has anyone tried this on a cookie sheet? I've read that adding another dish with water will help create steam and produce a nice crust. I will try this soon, but wanted to know if that would work here.
Vaishali says
You can cover it with aluminum foil if you don't have a lid. Placing it on a baking tray would cause it to spread too much, making it wide and flat.
This bread is very crusty, so I'd recommend not adding steam to the oven to make it crustier unless you've tried it out once.
Jenn says
I used a pyrex pie plate as my base and an upsidedown pyrex bowl as the "lid". It worked really well, but I had to be quite careful when removing the hot "lid" (bowl) after 30 minutes so as not to burn myself.
Patty says
Hello! Your recipe says to use an unfed starter. How soon after you feed it can you use it?
Jai Knauff says
This is a simple but perfect recipe. I went through many blogs to figure out how to bake my first sourdough boule. I think most sites just over complicate things. This is was easy to do and the bread came out just Amazing!
Estabanana says
A-mazing!!!! First one I mad about 4 days into my starter and it was really runny, almost like slime and made an amazing loaf anyways.
Making one today on day 6 of the starter and the dough actually stayed in a ball and doubled in size on the counter and I can’t wait!
I do have a question: the first round stuck to the bottom of the enameled Dutch oven, is there a preferred way to keep it from burning/sticking? I’ve seen posts about using corn meal or oil but neither of those sound good!
Thank you for al the amazing advice and helping make this process easy and fun!!
Robin says
I put mine in the Dutch oven on the sheet of baking paper. Stops it from sticking and makes for an easier clean up afterwards!
Louisa Balls says
Hello, I love this recipe - thank you!
Question: can you use this recipe as a base and add flavourings to it? I’m keen to try a Savoury rosemary bread and also a honey/cinnamon/walnut loaf. I am unsure at which stage to add the flavourings?
Vaishali says
Hi Louisa, happy you've enjoyed the bread. You can definitely add flavorings--best time to add is when you make the dough. If you add anything that may express a lot of liquid, you will need to adjust the amount of liquid in the recipe. You can use this recipe as a guide: https://holycowvegan.net/sourdough-olive-sage-loaf/
Robyn says
Hi .
I made my first sour dough loaf from your blog and it was so tasty and crunchy.
I would like to make a gluten free loaf.
Is it just as simple as swapping the wheat flour to gluten free. Or are other ingredients needed.
Thankyou
Vaishali says
Hi Robyn, you can try this recipe: https://holycowvegan.net/gluten-free-sourdough-boule/
Kunal says
Firstly my sourdough starter took more than 12 days to happen (even though I'm sitting in hot and humid Mumbai). On the 11th day I decided to make the no knead bread. I mixed the ingredients and left it overnight, but since I had started in the afternoon, it was kept out for about 16 hours. In the night as well as the next morning the dough had risen and looked nice, but when I decided to turn it, it was very sticky on the inside. I somehow managed to put it in the oven to cook now, but what would have made it so sticky? Was it too much hydration and less flour.
Also would it be possible to use only whole wheat flour for making the no knead bread? I always prefer whole wheat.
Vaishali says
Your sourdough starter may not have been strong enough, or your first rise may have been too long--don't let it go over eight hours, preferably. And although you are using an unfed starter, make sure it was fed no more than a week ago and was strong and bubbly at the time. The bread should rise the second time and should also get some oven spring in the oven--it's not normal for it to come out flat from the oven.
Vaishali says
No, if you used my starter with the correct hydration for this recipe it should be sticky but you should be able to work with it. If you use another sourdough starter you'll have to adjust for the correct hydration.
Vaishali says
You really need to use the parchment paper, like I say in the instructions. Otherwise you can't lift it out without deflating it. Please follow instructions.
Allison C says
I made a loaf of this bread over the weekend and it turned out beautifully! Like many others, the dough was super sticky and spread out as it rose. But that did not seem to matter. I used parchment paper and then set that down into the hot dutch oven. It rose well, looked similar to the pictures, nice big air holes and great flavor, cannot say enough about how it turned out. My crust on the bottom was a little tough to cut, but as I make this bread I'll likely figure out how to tweak the bake time and oven rack position to optimize it.
THANK YOU!!
Vaishali says
Awesome to hear!
Kellyanne Matt says
Hi
for the overnight prove is this on the counter or in the fridge please?
Thanks
Vaishali says
On the counter.
Alma says
I put an old cookie sheet on the bottom rack in the oven as it is heating. My no knead loaves also had a bottom crust that was near impossible to cut. This has eliminated that problem for me.