

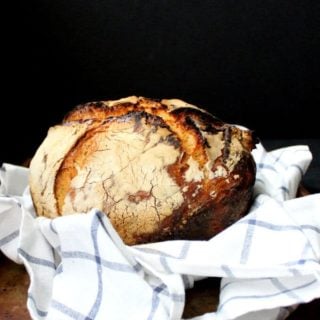
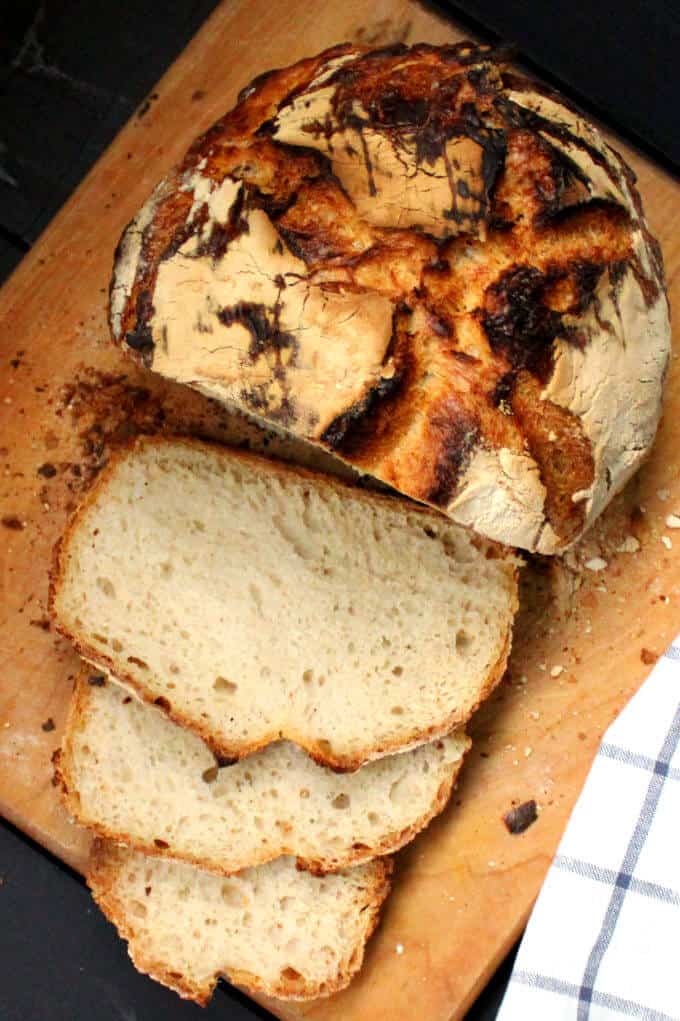
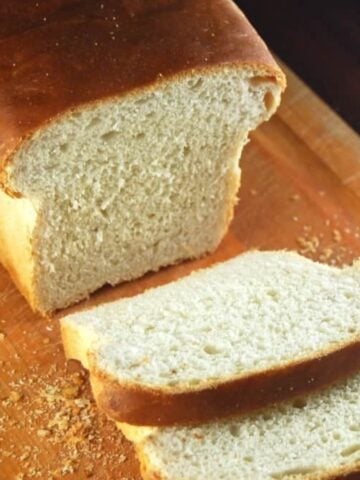
An artisanal loaf of No Knead Sourdough Bread that takes almost no skill and minimal amount of hands-on time. If you love making sourdough breads, this is one you absolutely want to try! All you need for this recipe is two ingredients -- a quality sourdough starter and flour. The bread is crusty with a tender, airy crumb and a delicious flavor.
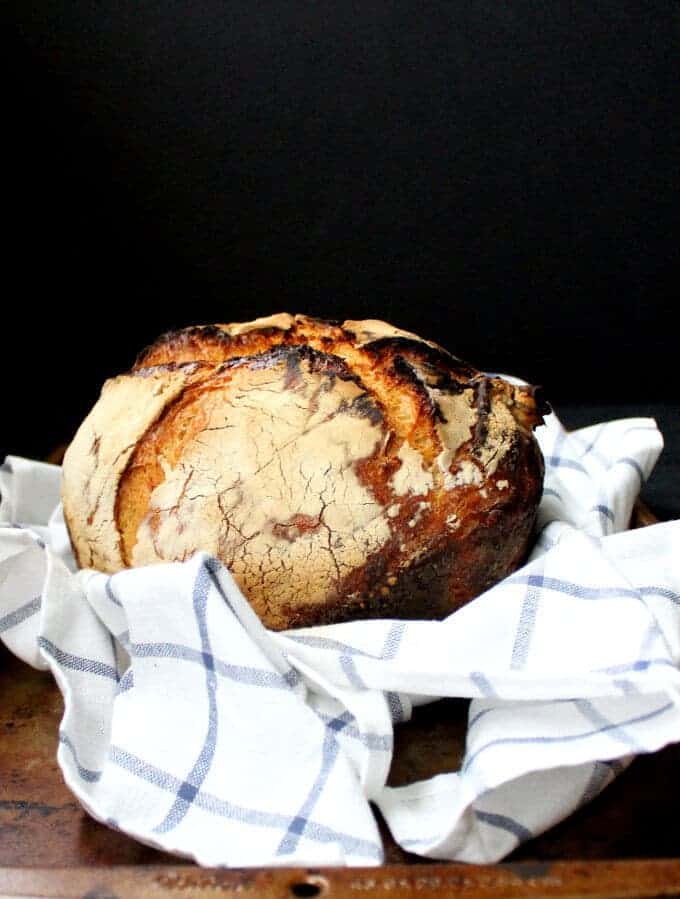
Table of Contents
No-knead sourdough bread
If making bread seems like a lot of work, I have for you the perfect solution: my no knead sourdough bread recipe.
This is really one of my favorite bread recipes, and one everyone in my home loves. It was my son Jay's favorite bread. He loved eating it fresh and once it was a day old, I'd toast it up for him and he loved it even more. With a dab of vegan butter, this bread is heaven itself.
I started out with a recipe from Sam Sifton, but over the weeks I've tried different versions of it, including a part whole-wheat one that is ridiculously good, although not as airy as the version made entirely with white bread flour. It does pack in a ton of flavor, though. But you can rest easy even with this recipe, which uses white bread flour, because the probiotic microflora in the sourdough slow down the rate at which glucose is released into the blood-stream, making sourdough bread -- yeah even white sourdough bread -- rank lower on the glycemic index.
The best part about making this bread is, I don't even need to refer back to the recipe. The ingredients couldn't be simpler or more basic and therefore easy to remember. The only real work is mixing up the ingredients, but you can do it all in one bowl and set it aside to rise. You do need some time for the sourdough to do its magic, but it's all hands-off time and some things are worth waiting for, aren't they?
The dough needs two rises. One is a longer, overnight rise, and the second is a shorter, two-hour rise. You will need a dutch oven or a heavy, oven-safe pot with a lid to bake the bread. My dutch oven is not enameled on the inside, but it works just great. You will also need some parchment paper or a kitchen towel for the second rise, with parchment a much better option.
I hope you will try this loaf and if you do, I know you'll love it. Just be sure to follow instructions (I am usually not a stickler for following recipe instructions, and I don't usually ask that you do that with my recipes -- except when you're baking breads and desserts). That way you can rest assured you get perfect, foolproof results.
Now for the no knead sourdough bread recipe. Happy baking!
OMG, my first loaf and so easy! It worked! The crust is like a bakery bread. I'll make it again. Thanks. - Janice.
Recipe card
No Knead Sourdough Bread
Ingredients
- ¾ cup sourdough starter (unfed is fine, but it should have been fed at least within a week of baking the bread)
- 1 ¼ cups water (use distilled or non-chlorinated water for bread, especially sourdough breads)
- 3 ½ cups bread flour (can replace 1 cup of the bread flour with whole wheat flour. The bread will be less airy but still delicious)
- 1 teaspoon salt
Instructions
- In a large bowl, mix the sourdough starter with the water, then add the flour and salt and mix until a consistent but sticky dough forms. You can do this by hand or in your stand mixer.
- Cover the bowl with cling wrap and let the dough rise overnight or 8-10 hours.
- Turn the risen dough onto the kitchen counter and form it into a ball as best as you can. If the dough is hard to handle, flour your hands but resist the temptation to add more flour. You want a dough with higher hydration or water content for a light, airy loaf. Adding too much flour will make your bread dense. Even if your dough doesn't form into a perfect loaf, it will shape up nicely during baking in the dutch oven.
- Prepare a sheet of parchment paper by sprinkling liberally with flour. If you don't have parchment, you can use a kitchen towel sprinkled with flour, but keep in mind that there is a much higher chance of your dough deflating when it rises on a kitchen towel because it will more likely stick to the towel. Place the parchment paper or kitchen towel on a baking sheet.
- Transfer the dough onto the parchment paper or kitchen towel, seam side down. Cover (I use the bowl I mixed the dough in), and let it rise another two hours.
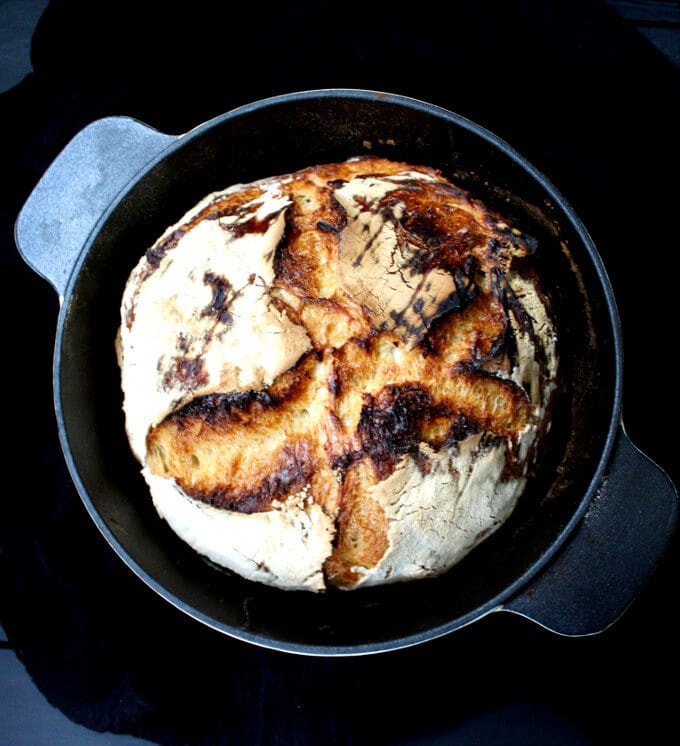
- About half an hour before your bread is done rising for the second time, preheat the oven to 500 degrees. Place a heavy cast-iron or other oven-safe pot in the oven with the lid on. (I use a 3.2 quart dutch oven that is not enameled on the inside. Enameled is even better.)
- Once the dough has risen, carefully remove your heated pot from the oven. Quickly, in a smooth motion, turn the dough into the pot so that the seam side now faces up. A parchment paper makes this much easier because the dough slides off more smoothly. Be very careful doing all this because the pot is very hot. If you find turning the bread into the dutch oven difficult to do without deflating it, you can just transfer the bread into the dutch oven with the parchment paper (don't do this if you used a kitchen towel).
- Put the lid back on the pot and bake for 30 minutes. Take off the lid and continue baking the bread for another 20 minutes. The bread will split at the top and char a little, which I love because the charring adds even more flavor.
- Once the loaf is baked, remove to a rack and let it cool about half an hour before carefully removing it from the pot. Let the loaf continue cooling on a rack. Slice and serve, or tear it apart with your bare hands (which you just might want to do because who has time for niceties when there's a delicious loaf of bread to be eaten 😉 ).
Notes
Nutrition Information
To print recipe card without images, uncheck "instruction images" after clicking the "print recipe" button.
Recipe FAQs
There can be a number of causes why the bread dough did not rise. These are the most common:
-You used a weak or inactive starter. Make sure that the starter is active - it bubbles and rises within hours of feeding. And if you used sourdough discard, it should have been fed no more than a week back, and should have bubbled and doubled after being fed.
-The dough was not proofed in a warm spot. Sourdough bread dough needs to be at a temperature between 75 and 82 degrees Fahrenheit in order to rise.
-You used a starter with a very high hydration so the dough was too wet, which would cause the gluten to collapse.
-You deflated the bread dough when you turned it into the heated Dutch oven. You can avoid doing this by placing the loaf, including the parchment paper, in the Dutch oven.
You can, but bread flour has more gluten and will give you a higher bread.
The cast iron heats the bread dough evenly and it also traps steam, yielding that wonderful, crusty crumb.
Yes, you can use a cast iron skillet, a glass or metal baking pan, or even a baking sheet dusted with corn meal. Because the dough is loose it may spread more in a baking pan or on a baking sheet, giving you a flatter bread, but it should still have the great crumb. To make the bread crustier, place a small baking pan filled with water on the bottom rack of the oven when you begin to preheat it.
Absolutely. Wrap it in freezer-safe wrap or freeze in a freezer-safe container for up to four months. Thaw completely and warm in oven before slicing and serving.


Bren says
This is my second attempt at this bread. Like others I had some problems with the dough being wetter than expected, but it raised fine and I was happy with results. But, both times, the crust is extremely hard—have to work hard to get a serrated breed knife to break through it.
Anybody else have this problem? Any ideas for a solution?
Further info: I am baking this in a small (chicken size) enameled roasting pan because it’s the only lidded pan that I have that will take this heat. The second loaf was baked with a pan of water once I removed the lid, but I don’t see any difference.
Would love to perfect this recipe! I have some starter that began in Alaska over 120 years ago so I’d like to do it justice. ? Thanks for any help.
Joe says
120 year old starter...Amazing!
Vaishali says
Hi Bren, how wonderful -- a 120 year old starter! This is supposed to be a crusty bread, so the crust will be hard. You can add some butter to the recipe to soften it a bit. I just pop it in the microwave or toaster oven for a few seconds to make it easier to slice the next day.
Jane says
I was skeptical. We've never enjoyed supermarket sourdough bread, which we found too dense with an off-flavor. But we missed our homemade peasant bread, a New York Times recipe not unlike this one, but leavened with yeast, which I made twice a week. We now have a new favorite, courtesy of Vaishali and Mario, Andrew’s dad and a hero of mine. Despite being a little overhydrated, Mario performed beautifully and produced a golden tasty loaf, only a little spread out. Thank you so much!
Question: I have about 1/2 cup of Mario left. Do I build him up starting all over again now or place in fridge and build up gradually?
Vaishali says
Hi Jane, that's so great to hear. Yes, please start building up your starter again by feeding it.
Juliann says
My first try: not a bad rise, about 3.5” high when it came out of the oven. My first rise was good, but like others, my second rise it hardly rose at all. Perhaps because I let my first rise go 12 hours? (I forgot about it in the morning). I also used white all purpose flour. Not a bad loaf, just not as large as in the photos. Nice crust and still air pockets inside. Any suggestions for next time? How do you keep it from deflating between first and second rises? Perhaps post a video of how you handle it in between rises?
Vaishali says
Hi Juliann, an eight-hour rise is optimal for the first rise. It will deflate after you handle it before the second rise. When you turn it back into the dutch oven, if you find it hard to do, just put the loaf into the dutch oven with the parchment and then put the lid on.
Sandra says
Can you keep the dough on the parchment and lift the parchment with the dough into the dutch oven? it's how I've been making regular no knead bread and it works well. Thanks!
Vaishali says
Yes! Absolutely.
Lezlee says
Hi, Thank you for the SD starter recipe. My daughter & I started feeding our starter last weekend. Tonight we mixed up the no knead SD bread. I'm hoping our starter is ready! A couple of quick questions... 1. I have a cast iron Dutch oven I use when camping. I usually use a liner when baking in it. Can I use a liner with the bread? If not, should it be greased with oil so it doesn't stick? 2. It says to preheat oven to 500°. Is that the temperature for baking the bread for the entire time?
Thanks again! Hoping for success!
Vaishali says
If this is just a regular cast iron Dutch oven no need to oil, I am not sure what a liner is. And yes, you do need to bake throughout at 500 degrees F.
Tess says
could you share a picture of what the dough looks like? I followed this recipe to a T, but my dough was so sticky it couldn’t hold a shape. and despite the gorgeous huge rise it did overnight, it did not rise very much at all for the second rise (it almost completely flattened when I transferred it to parchment paper). in lieu of a picture I’d appreciate any other advice you have for that. Thank you!
Vaishali says
It sounds like you deflated your dough when you transferred it from the parchment. Like I say in the instructions you need to be very careful when you do that. It may not rise much the second time but so long as you don't deflate it, it should rise even higher during baking because of "oven spring."
Barb says
I had a very similar problem as Tess. My overnight rise was excellent. It seems that when I removed it from the bowl, it deflated severely and never really regained any rise. I baked it anyway to see if it would get any rise in the oven but didn't happen. Tastes wonderful but it's less than 2 inches in height. Any hints. Planning to try again soon.
Vaishali says
Hi Barb, when did you last feed the starter? It could be that the starter you are using is simply not strong enough. While you can use unfed starter here, it should have been fed less than a week before. You can just feed your starter about six hours before baking the next time.
Elaina says
I only have all purpose flour, is that ok to use- instead of bread flour?
Vaishali says
Yes, that's fine!
Melissa says
Hi Vaishali,
Thanks for this beautiful and easy bread recipe.
I'm new to SD bread and am ready to try yours except my very old Le Creuset dutch oven can only go up to a temp of 450 which is the temp the other SD bread recipes I baked called for.
Can I try to bake your bread at 450? And, if so, should I make any other tweaks in the recipe.
Thanks, Melissa
Kate says
This is probably a really dumb question, but I'm a newbie to baking in a dutch oven! When you add your dough to the dutch oven, do you put the whole thing back in the oven? Or is the oven just to get the dutch oven hot, and the dough bakes directly in that outside of the oven? Thanks!!
Vaishali says
You need to put the dutch oven back in the oven! The heat of the dutch oven is not enough to bake the bread.
Courtney Knight says
Thank you so much for writing this down, I had a very successful result!
Question: I was wanting to use this recipe to make sandwich bread and put it in a loaf pan. Is that doable? Should I change anything up?
Again, much obliged! 🙂
Vaishali says
You can follow my sandwich bread recipe here:https://holycowvegan.net/best-sourdough-sandwich-bread-yeast-free/
lori natoli says
Hi
I have just finished making my starter for the sourdough and have mixed my dough for the loaf. My oven doesn’t reach 500 F it maxes out at 480 F , what should I do ? I do have a Weber bbq should I bake my loaf in that ?
Regards
Lori
Vaishali says
Just bake at 480 and increase baking time by about 5-10 mins. You may not get as much of a rise in the oven but overall should be okay.
Anonymous says
Ok got it. ?
Ave Bonar says
You do not say at what point to save back starter for the next baking. I assume it has to be before salt is added since salt will kill the yeast. And I assume it would be 3/4 c. since that's what the recipe calls for. Can you please clarify?
Vaishali says
Look at the sourdough starter recipe for instructions on feeding. Always replace proportionate to what you removed. https://holycowvegan.net/make-sourdough-starter/
John says
Can I use my starter straight out of the fridge or do I have to add flour and water stir and wait till it rises regards John
Vaishali says
For this bread, you can use the starter straight out of the fridge, so long as you have fed it at least a week earlier.
Laura says
So do I use my discard starter straight from the fridge? Or do I need to set starter out ( not feeding it) until the next day when I make the dough?
Vaishali says
Straight from fridge is fine.
Mike S says
I was really excited to try this recipe because the last one I made was bigger than I needed. After rising overnight I ended up with a sticky, gluey mess that I couldn’t shape as it stuck to everything but itself. I tried adding more flour but ended up losing so much dough down the sink from washing my hands I ended up throwing it all away. I’m going to go back to recipes that list ingredients by weight. Since no one else seems to have had my problem I’m not going to leave a star review since I may be too grumpy right now
Vaishali says
Sourdough breads with large, airy holes will always have a higher hydration and therefore a sticky dough. I will clarify this better in the recipe but you need to keep this in mind anytime you bake a sourdough bread that has large holes. If you try to make it like regular bread dough it will end up dense. Use flour on your hands while shaping and get it into as good a shape as possible--the cast iron pan will help shape it into a boule while baking.
Mike S says
Thanks! I will try again at some point and keep that in mind
Adam says
As Valshali mentions, you can't really treat it like "normal" dough. If it's kneadable, it'll be a brick. Really, sourdough should be considered "normal", but anyway...
I do 100% whole wheat, with an hour or two of autolyse (mixing water and flour and letting it sit) before adding the salt and starter. After it's all mixed, I put it in a loaf pan, let it ferment overnight (at least 12 hours - I like it sour), and throw it in the oven the next day.
I've been playing with different hydration levels, but over 100% seems to be key to getting a good rise (at least with whole wheat, which is a non-negotiable for me). It's still dense, and I have more experimenting to go, but it tastes amazing!
Good luck!
Liliana Wells says
Hello, I am waiting on the starter to grow and look forward making this no-knead recipe. My question is, I do not have a Dutch oven. Even the oven proof pots and pans I have cannot withstand the 500 degrees required to bake this bread. Can this be baked at a lower temperature? Thanks for sharing your recipes.
Vaishali says
Hi Liliana, you do need a very high initial temperature for sourdough breads because that's what gives them the "oven spring" -- the great rise that causes those airy holes. Do you have a casserole dish that can withstand that temperature? You could cover it with aluminum foil. If you bake at a lower temperature you will need more time and your bread might not turn out as good.
Greentea says
Hello. I made this recipe twice and the first time my bread could not form a ball but it had an amazing taste ! So I started again but I adapted the quantities : your sourdough is 1-0,75 flour - water and mine is 1-1 (same gr of flour and water each time).
So I did some maths 🙂 to have the same quantities of water and flour as you.
I land on 187 gr of sourdough (like you but with mine sourdough) with 450 gr flour and 282 gr water.
The result was perfect : I could shape a ball and the bread was very nice.
One little problem : I forgot the salt (no comment :-p ) so I’ll try again ...
As my Dutch over is bigger than yours, my bread is quite flat. I’try with a Pyrex with a lid next time.
Thanks again !
I’ll have a look at your other bread recipes as I feel more confident now 😉
Megan says
OMG, I'm reading comments while preparing my dough, and ALMOST forgot my salt. THANKS for the reminder.
Jessica says
I used my unfed starter, but let the first rise happen in the fridge overnight. I also added olive oil to the dough in the beginning. The bread rose beautifully for the second rise and I placed it on parchment first before placing in the Dutch oven (enameled). It is perhaps the best bread I’ve baked thus far! Thank you!!!
Danielle Polage says
How long are you mixing the dough initially? It says no knead but it's super sticky and I keep mixing and waiting for a dough to form but it isn't happening. Can you give a approximate time frame I'm mixing it in a stand mixer.
Danielle Polage says
Also when you're putting it onto the counter and forming it into a ball are you kneading it? Why not just form it in your hands and plop it onto the parchment?
Danielle Polage says
Do you add flour or oil or anything while you're putting it on the counter it's so sticky?
Victoria Bradley says
Hi,
I let mine sit for 12 hrs and it’s a super sticky mess. There’s no way I can form it into a ball. How do I fix it? Is it that my starter wasn’t ready? The dough doesn’t look to have risen at all. Help!
Dann says
This recipe, while delicious - needs at least 1 cup more flour added to help it form into a round loaf that holds it's shape. When I baked this it turned into a rather flat, but still very tasty loaf of bread.
Jo Bella says
I started a starter on Friday afternoon and today on Tuesday afternoon started this recipe with wholemeal flour and today baked the loaf. What a glorious thing! It is divine. How could I ever go back to yeast? Next, hot cross buns
Mary G says
Delicious!
Used my own starter and it came out beautifully!
Devon Marcel says
Hi! I started my own starter a few months ago using your recipe and she and I have made some delicious adventures together. However, I tried making this recipe and ran into a snag. While I made a beautiful, delicious loaf, I lost the entire bottom due to sticking to my enameled dutch oven bottom. Your instructions say to preheat the dutch oven with the oven but you -cannot- preheat an empty enameled dutch oven. So I'm wondering if that's where the trouble is. How do you think I can avoid the sticking problem?
Donna says
Leave the parchment paper with the dough and just lower inti enameled pan. I do this and it works great!
Jo Bella says
I always preheat my dutch oven as this is how you get the temperature right for proper baking without kneading. And I also always place mine in the pot gently using the baking paper that I have shaped the loaf on that way you don't burn yourself - its also easier to get out when it's done.
Anonymous says
I have had no issue with rehearing an empty Dutch oven. Bake the bread on parchment paper.
Paul Casali says
Hello there, stumbled upon your website and have to compliment and thank you for what you do and share, it is wonderful. My Daughter and I are both clinical coeliacs (confirmed medical diagnosis, not just eating gluten free for the fun of it) and we are not impressed at all by the poor quality of commercial GF breads... and being of Italian descent we crave the stuff!
So I am about to embark in the sourdough adventure using your GF starter recipe and this “no knead” bread looks absolutely devine, there is only one catch... your instructions state to set oven to 500F, which equates to 260C and I cannot find any casserole dish (the British/Australian name for a dutch oven) that is safe at those temperatures! Most I could find was an expensive brand which is limited to 240C.
Any suggestions?
Many thanks
Paul
Perth - Australia
Vaishali says
Hi Paul, you can make this in a cast iron dutch oven if you have one or use a baking sheet -- form the bread into a boule as best as you can, although it may bake up a bit flatter. I don't know if you're planning to adapt this recipe, which is not gf, but in case you're looking for a gf recipe, see my glutenfree sourdough boule here: https://holycowvegan.net/gluten-free-sourdough-boule/
Cammie says
I've baked mine in a stainless pot with a lid. Worked great. I also carefully scrape my dough into a parchment lined bread basket for the second rise and then lift the parchment with dough right into the pan after rising. I don't have to shape it into a ball and the basket keeps it from spreading too wide during the 2nd rise.
Kandace says
So first rise of 8-10 hrs should be in warm place or refrigerated please? Anxious to try this out! Thank you!
Vaishali says
Warm place! Kitchen countertop on a warm day is fine.
Tina says
I made this yesterday! About two weeks ago I made a sourdough starter using your recipe (named him Thaddeus, very important detail lol), and this was my first attempt at a sourdough loaf! My starter is made from bread flour. I hear that's important because different types of flour take on different flavors. I was skeptical that this bread would work, as the dough was SO FREAKING STICKY and really ... I don't know the word... loose? Runny? However, I followed instructions, popped it in a makeshift dutch oven (a bunch of foil awkwardly fashioned in a big baking tray), and hoped for the best. My loaf didn't char like yours - it just turned a lovely golden brown. I think my oven temperature might be a bit inconsistent. *BUT* - the bread turned out great! It was so light and fluffy, with just the right amount of chew and crunch in the crust. The bottom crust was really firm - very difficult to cut through. I don't know what happened there. However for a first attempt I consider it a resounding success. I brought the loaf to a potluck dinner party, served it with some Melt vegan butter, and everybody really liked it! Thanks for your recipe! I look forward to trying it again.
Stacey says
What if you don't want it charred? I'm cooking it and it's almost burnt... really hard to eat. Should I lessen the time with the lid off?
Shelli says
Hello,
For the 8 to 10 hrs, is that overnight in the refrigerator?
Thank you
Meg says
Sorry about random words.... Auto correct! Predicting!
Vaishali says
Hi Meg, thanks for letting me know. I don't own a scale right now, but will keep this in mind for future.
Meg says
I love your blog and would really, we really appreciate it if o7 used gram measures instead of cup measures.... I'm in Australia and we use metric Cups... I just too hard to work out each time, john and it never quite does... Thanks in advance.
lexi says
Hi there! Is this sourdough starter fed or unfed? 🙂
Vaishali says
Both will work, but for this one I used unfed. I'll also clarify in the recipe.