

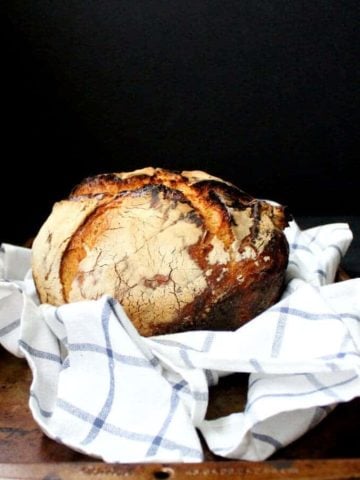
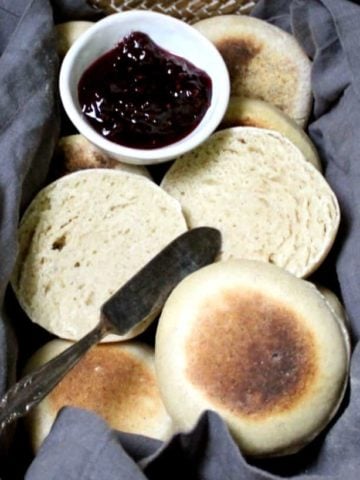
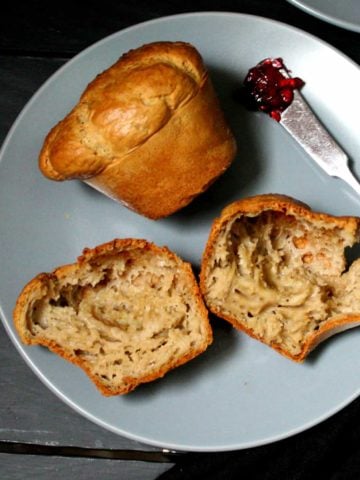
These fan favorite sourdough dinner rolls are perfectly crusty with a soft and fluffy crumb. They are made with a no-knead dough so they're super easy, and they need just two ingredients: flour and sourdough starter. Tear one apart to dunk into a soup or stew, or slather some vegan butter and dig in!

The perfect crusty sourdough dinner rolls
These really are the perfect sourdough dinner rolls (200-plus five-star reviews say it all!). They have a delicious crackly crust and a soft and pillowy crumb that's perfect to soak up stews and curries with! An active, bubbling sourdough starter and an overnight first rise gives these rolls amazing flavor and texture. If you don't love sourdough but want to eat it for its immense health benefits, you might like the fact that the flavor is obvious but not overwhelming.
As the baker, my favorite part of this sourdough dinner rolls recipe is that I need just two ingredients - flour and sourdough starter - and I don't need to do any kneading. At all. Just put the ingredients in a bowl, mix them up into a dough, proof overnight, shape the rolls, let them stand again for a couple of hours, and bake! Breadmaking doesn't get any easier than that.
If you have a very robust starter and you fed it a about a week ago you can use it to make these sourdough dinner rolls (I have, with good results). But using a recently fed, active sourdough starter will give you the best rolls. I fed my starter, George, who has been lounging in the refrigerator most of this summer, about eight hours before I made the dough and he bubbled up nicely in that time.
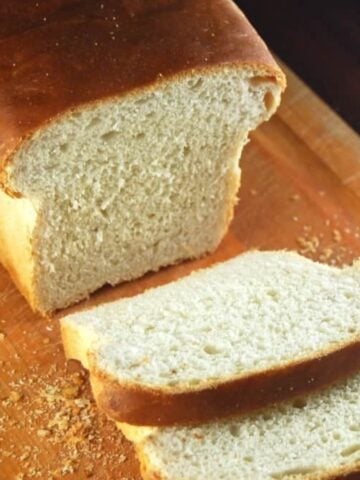
P.S. If you are looking for sourdough dinner rolls with a softer crust try this recipe.
Have been trying different sourdough recipes and this one is probably one of the easiest! No drawn-out kneading or meticulous measuring. Followed the instructions exactly, got good dough rise. Recipe makes 12 medium-large rolls that look professionally made (especially if you score them as instructed). I baked for 25 min and they were perfect. -Stephanie
Recipe card

Crusty Sourdough Dinner Rolls
Ingredients
- 3 ½ cups bread flour
- 1 ¼ cups warm filtered or distilled water
- ½ teaspoon salt
- ¾ cup active sourdough starter (made using my recipe linked here. If using sourdough with a different hydration, you will need to adjust the amount of water)*
Instructions
Make the sourdough dinner rolls dough
- Place all the ingredients in a large bowl or in the bowl of a stand mixer. Mix in the stand mixer or with your hand until a consistent dough forms. The dough can be slightly tacky but it shouldn't be wet.
- Cover the bowl with cling wrap or a tight lid and let the dough stand overnight or for 8-10 hours on the countertop, if warm, or in a cold oven with the light on.
Shape the rolls
- Punch down the risen dough and shape the dough into 12 equal-sized balls. Place the rolls 2 inches apart on a generously floured or parchment-lined baking sheet.
- Dust the tops of the rolls with more flour, cover with a kitchen towel, and set aside to rise for 2 hours.
Score and bake the rolls
- Fifteen minutes before the rise is done, preheat the oven to 425℉/220℃.
- Just before putting the rolls in the oven, score the top of each roll using a sharp knife. Make the cut fast, to prevent the roll from deflating. Scoring gives the gases that form in the bread escape while baking and helps the rolls rise.
- Place the rolls in the hot oven and bake 25-28 minutes or until the rolls are a light golden-brown and sound hollow when tapped. Remove the rolls from the oven and continue cooling on a rack.
Notes
Nutrition Information
To print recipe card without images, uncheck "instruction images" after clicking the "print recipe" button.
How to make sourdough dinner rolls

- Place all the ingredients in a large bowl or in the bowl of a stand mixer.

- Mix in the stand mixer with the dough hook attachment or with your hands or a ladle until a consistent dough forms. It can be slightly sticky but it shouldn't be wet.

- Cover the dough with cling wrap or a tight lid and let it stand overnight or for 8-10 hours on the countertop, if warm, or in a cold oven with the light on.

- Punch down the risen dough and shape it into 12 equal-sized balls. Use flour on your palms to roll, if the dough feels sticky.

- Place the shaped rolls two inches apart on a generously floured or parchment paper lined baking sheet.

- When the rolls have risen, score the top of each roll using a sharp knife or a bread lame (an implement designed to score bread). Make the cut fast, to prevent the roll from deflating. Place the rolls in a 425 degrees Fahrenheit/220 degrees Celsius oven and bake 25-28 minutes or until the rolls are a light golden brown color. Remove from the oven and continue cooling the rolls on a wire rack.

Top tip
Score the rolls before baking! Scoring allows the gases that form in the sourdough to escape in the oven and helps the rolls rise. If you don't score the rolls the gases will find an outlet at a weak spot in the dough and cause a split there, which might not look great. Scoring ensures your sourdough dinner rolls look artisanal. For the best look, score from end to end - the rolls will puff up like little balls!
Sourdough rolls FAQ
Yes, click on the "metric" tab in the recipe box for precise weight measurements.
Yes. Bread flour will result in a fluffier crumb and a crustier crust, but if all-purpose is what you have, you can use it.
You can, but make sure it was recently fed and is strong.
Use a recently fed, bubbly sourdough starter for best results. I have sometimes had good results with using discard from a healthy starter fed no more than a week before I make the rolls. But if you want foolproof rolls I recommend using recently fed starter.
That could be due to one or all of three things: you let the first rise go on for too long, the strength of your sourdough starter and the weather conditions in your area. Make sure your starter is robust and also don't let the first rise go on and on - no longer than 10 hours. The rolls won't rise a lot after shaping, during the final rise, but they will "spring" in the oven (see my photos in the step-by-step instructions - the rolls haven't quite doubled). Finally, make sure the rolls are sitting in a warm spot. If you take care of all these elements, follow rise times, and score the rolls, rest assured the rolls will rise in the oven.
My sourdough starter uses a 1:¾ ratio of flour to water. If you use a greater proportion of water in your starter, use just 1 cup of water in the sourdough rolls recipe below and slowly trickle in more water into the dough if needed. If your starter has a lower proportion of water than mine, start with the same amount of water as the recipe but trickle in more water into the dough, a tablespoon at a time, if needed. The final dough should be slightly tacky but not wet.
This dough is slightly tacky - it will stick a bit to your fingers and the countertop - but it should not be wet. If the dough turned out very sticky, you likely used a starter with a different water-to-flour ratio. See the question above for how to tweak the dough to your specific starter.
There are two possible reasons: your sourdough starter has a different water to flour proportion, or you are working in a drier climate or at a higher altitude than I am. If your dough is not coming together, add more water a little at a time. The dough should be shaggy and very slightly tacky but not overly sticky.
I always make these rolls with bread flour so I can't say for sure, but one reader commented he has tried these rolls with ½ cup rye, ½ cup whole wheat flour and rest all-purpose flour, and they turned out nicely.
Yes, place them side-by-side in a 9 X 13 inch baking dish or a cast-iron skillet (which will give you a crustier roll). The rolls will join together as they rise and bake.
More sourdough bread recipes


Kati Spencer says
I’ve made this recipe several times and cannot remember if you should use discard or fed starter (levain). Making these for new parents along with dinner for them! Thanks!
Vaishali says
You can use discard from a thriving starter fed no more than a week ago.
Cristine says
These look amazing! I assume you use unfed starter since you did not state otherwise. and should the starter be room temperature or okay cold from the refrigerator? thank you
Rebekah says
So easy and delicious! I sprayed the top with avocado oil and sprinkled everything but the bagel seasoning on them. Most of the seasonings came off when you picked them up. I’ll figure it how to keep the seasonings on. Also, next time I’ll make 16 rolls. The bigger ones didn’t stay in nice balls but the smaller ones were perfect.
Vaishali says
Love that you used the bagel seasoning. Sounds delicious!
Bryan says
I have a 100% hydration rye flour based starter I used to make this recipe. Its the first time I have made bread using "cups" as the measure...I had always weighed things to the gram. I noticed while the ingredients were mixing in my stand mixer that it seemed too dry. I ended up having to add more water (maybe 1/8 cup total?) to get all the flour combined into a ball. It all worked out to produce great rolls! Much easier than breaking out the big heavy cast iron dutch oven to make a single boule.
Sharon B says
First time making these and very pleased with how they came out. A bit tricky working with sticky dough and they seemed flatish after the second rise. However, they puffed up beautifully in the oven.
Rebekah says
I do think the amount of starter is more than needed. I doubled this recipe but kept the amount of starter at 3/4 cup (and next time will actually drop it down to 2/3 cup) and let it bulk ferment overnight and it was perfect. I do love how easy this recipe was, the dough consistency was easy to work with, the flavour is great, and it was quick to roll up the buns even with 24 of them. I’ll definitely be saving this recipe for another time!
Merber says
Made these this evening. Kts hot here, so made the dough this morning and baked this evening (shaped from 7, baked at 8.45). They weren't very big and very crusty. Tasted amazing though. Much easier than doing a loaf so will definitely bake again.
Maria says
Hi, Vaishali! Can seeds be added to the dough? When would you recommend doing so, when mixing everything? How much? 10% of the dough weight? I was thinking sunflower and pumpkin, would they work?
Vaishali says
Hi Maria, sure, seeds would be great. Brush on some water just before putting the rolls in the oven and add the seeds.
Anne Laloge says
I’m having trouble forming my rolls; they seem round but end up misshapen when baked. Any thoughts?
Vaishali says
Hi Anne, perhaps there's too much moisture in the dough. You might try reducing it.
Renee says
I put sesame, poppy, onion garlic and salt (everything sprinkles) on mine .. smells divine while cooking.
Eboni says
I'm making the rolls for Thanksgiving dinner. And a significant portion of my family is vegan. So I am making a vegan version as well. But I want to make them the day before so I don't have to do all of this at dinner. Will these freeze well and reheat well?
Vaishali says
If you are making them a day before keep in fridge and reheat.
Chay says
Hi! I made the dough now but just unsure the grams to cups isn’t matching up. Which one should I do? 3 and half cups of flour and the 437 grams came out to much more then the 3 and half cups.
Vaishali says
Hi Chay, I've noticed that flour from different brands can have different weights. It was a while back but I think I used King Arthur flour for this. Just proceed with 3 1/2 cups of whatever flour you're using.
Arlo says
This sounds like a great recipe. Just what I need. You mention that the hydration of the starter should be that of your linked starter recipe. However, those measurements are by volume so it’s hard to determine the hydration level. What starter hydration should I use in this recipe? Thanks!
Jane says
Has anyone substituted whole wheat flour for the bread flour? If so do need to change the amount?
James says
I did. The rolls came out quite dense and heavy. I think I'll try 50/50 next time and see how they come out.
Paul says
I do 1/4 cup rye 1/2 cup WW and the rest AP. Yum.
Hannah Pals says
I don't understand the suggested timing assuming I'm making these for dinner. So I'll make the dough and let rise over night. Then if I'm to separate into balls in the morning and proof for 2hr, then I'm about 6hr ahead of my preferred baking time. Mind helping?
Deb says
Make the dough early in the morning instead of the night before, then about 3 hours before dinner shape and proof the rolls.
Johanna Bott says
Hi,
This is my first time making this recipe and I plan on making it for thanksgiving. We are eating at 1 PM. So my question is, will it be too long to wait and cook the Rolls at noon instead of in the morning?
Vaishali says
Hi, yes don’t overproof the rolls. You can reheat them before serving.
Jeb says
Or put them in the fridge to slow the rise, that works great, too. They can go in the oven cold, or if they don’t appear to have risen enough, take them out of the fridge an hour or so before baking.
Jennifer says
Made these for a work chili cookoff--they were a big hit! I made 2 dozen thinking that would be plenty, and they were gone before the first hour was up. I'm thinking next year I'll have to make 4 dozen, but I'm wondering if the amount of sourdough starter can be reduced and given a longer proofing time instead? 3 cups of sourdough is quite a bit 😉 My starter is also 50% hydration, but I used AP flour so the dough hydration was just fine.
Stephanie says
Have been trying different sourdough recipes and this one is probably one of the easiest! No drawn-out kneading or meticulous measuring. Followed the instructions exactly, got good dough rise. Recipe makes 12 medium-large rolls that look professionally made (especially if you score them as instructed). I baked for 25 min and they were perfect.
Vaishali says
Hi Stephanie, so happy you loved the recipe. Thanks for the feedback.
Salome says
I tried the recipe but had to add a bit more flour the douhg was very sticky. It turned out good, but a bit too sour and not fluffy enough. Could I use less starter? Mine were pretty flat, how do they keep the nice shape. I let them rise for 6 hours, it was fairly warm. Any tips how I can improve?
Vaishali says
Hi Salome, it sounds like your dough might have overproofed, which gave it the sourness and deflated the rise. Try feeding the sourdough about six to eight hours before you make the dough and don't let it rise as long if it's warm where you live.
Salome says
Thank you so much, I will try that, I will watch the rise better, that helps.
BevThorn says
My first batch was kind of wet and a little flat, but very flavor full, I read other comments and tips and proofed the next batch in fridge over night.they were perfect round rolls, but not as flavorful. If I have to choose, I’ll go with the flatter and more flavorful,I. The sour dough sense!
Coral says
Hi,
Thanks for the recipe. It turned out great. I loved the fact it does not require kneading.
I used 420g flour of bread flour and 3/4 (approx 178g) starter.
It was a very sticky dough after the first proof, and find it slightly difficult to shape it (tired not get rid of air in the dough) I used about 1/4 cup of flour to flour the surface of the board before transferring the dough to board. Any recommendations:
1. how to shape individual rolls?
2. How to divided/ cut up into individual pieces?
3. In your instructions you mentioned rolling the dough, what exactly did you mean? Rolling it flat?
Thank you.
Vaishali says
Hi, happy you loved them. The dough will be a bit sticky--that's what makes the rolls so airy, the high hydration. It is fine to add more flour to help shape the rolls. Apply some flour to your palms which should make it easier. I don't think I mentioned rolling the dough anywhere, so not clear what you are referring to.
Sharon says
Same thing happened to me. After the overnight proofing like less than 8 hrs it turned into a sourdough starter like. So i cant roll as its so liquidy. Instead of rolls i transferred it into 2 loaf pan. Added dried cranberries and pine nuts. So still in the 2nd proofing. Lets see if its good later.
Leipuri says
Too warm in your kitchen! These might be better if kept in the fridge overnight.