

A foolproof recipe to make your own, homemade Italian ciabatta bread in under four hours!
You might also like these recipes for Italian bread and Tuscan bread.
Ciabatta is my favorite Italian bread, but it is not always the easiest and quickest bread to make, even for a seasoned baker.
The dough is rather wet and sticky and can seem impossible to work with when you're new to the process, but that wet stickiness is also vital to the light, bubbly, airy texture of this bread.
This also is a bread that requires some planning ahead because you need to let the starter stand overnight or at least several hours. And planning ahead is not my favorite thing to do.
I was resigned to making ciabatta only when I have the time, which is not often, until I came upon a great technique that cuts down the waiting significantly.
The initial rise time for this ciabatta is under two hours, and the second rise is just about an hour. So in under four hours, including prep and baking time, you are rewarded with a fluffy, crusty, delicious bread that you won't be able to stop dunking in olive oil and popping into your mouth.
More vegan bread recipes
Recipe card
Quick Ciabatta
Ingredients
- 4 cups all-purpose flour
- 2 ¼ teaspoon active dry yeast
- 2 ¼ cups warm (not hot) water (you might need more if you are in a dryer area)
- 1 teaspoon salt
- ¼ teaspoon sugar (not usually found in traditional ciabatta, but it really helps speed the rise)
Instructions
- Mix the sugar, water and yeast in a bowl and set aside for five minutes for the yeast to start working.
- Add the flour and salt and mix in a stand mixer fitted with a paddle. You want the mixture to be just slightly thicker than a pancake batter-- it should definitely not pull together into a firm dough.
- Let the mixture stand for about 15 minutes. Then turn on the stand mixer to a medium-high setting. After about six minutes, the dough will start to make a flapping sound and start rising up the sides of the bowl.
- At this point, switch the paddle for the dough hook and knead for another six to seven minutes until the dough starts pulling cleanly off the sides of the bowl. It will be smooth at this stage but still very sticky and loose.
- Grease a bowl and pour the dough into it. Cover with a plastic wrap or kitchen towel and place in a warm spot, like an oven with the pilot light on.
- In about 1 ½ to 2 hours, the dough would have tripled.
- Prepare a cookie sheet by lining it with parchment paper and then dusting the paper liberally with flour.
- Pour the dough out of the bowl and into the center of the cookie sheet. Dust the top with flour.
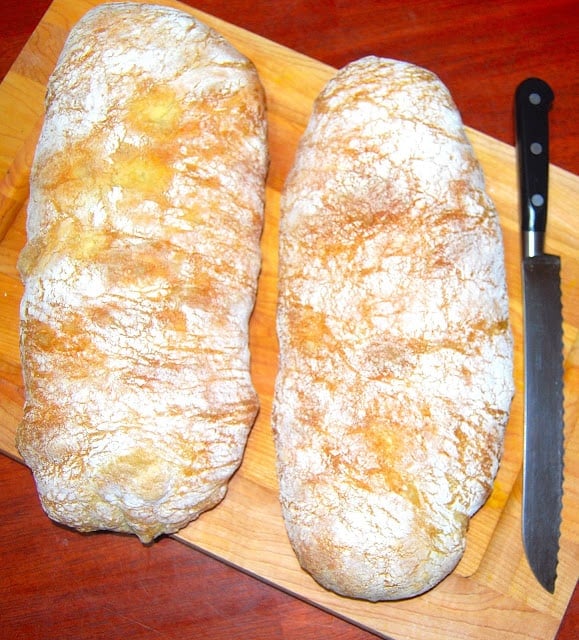
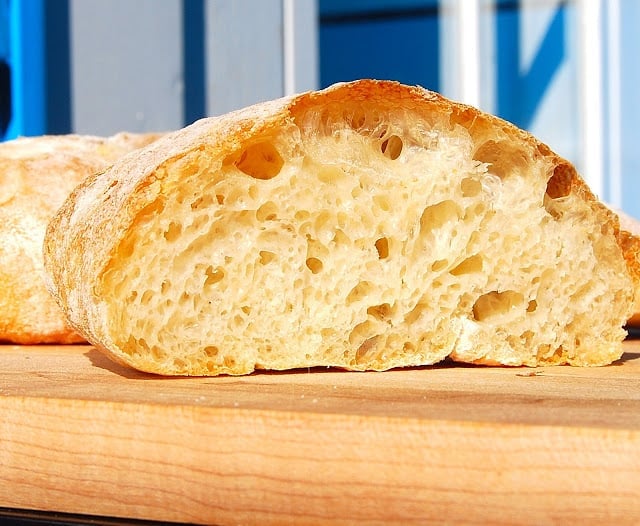
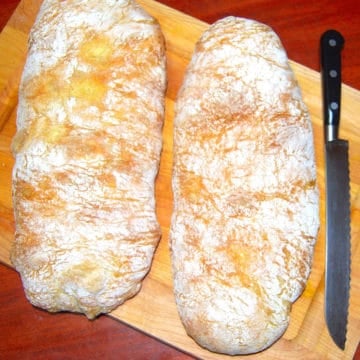
- Using a bench scraper, divide the dough into two pieces. Using the bench scraper and a wet hand if needed, shape the dough, tucking the irregular pieces underneath, until you have two flat logs. The logs should be about six inches apart. This is a rustic bread, and the wet dough is not going to hold a definite shape, so don't even try for a beautiful, even look. This is known as an Italian slipper bread for a reason. The baked bread will turn out absolutely gorgeous, trust me, with a translucent, lit-from-within look and those gorgeous air holes.
- Dust some more flour over the logs, then cover them with a loose kitchen towel and place in a warm spot for about an hour or until the logs are risen and all puffy-looking.
- About half an hour before baking, place a pizza stone or baking stone on the middle rack and preheat the oven to 500 degrees Fahrenheit. Place an empty, oven-safe pan on the bottom rack before preheating, then carefully add a cup of water to it just before you place the bread in the oven.
- Place the ciabatta loaves directly on the baking stone by sliding the parchment off your cookie sheet. If you are not confident about doing this, just place the entire baking sheet on top of the baking stone.
- Bake for 25 minutes or until the loaves are golden-brown and the bottom sounds hollow then tapped.
- Cool thoroughly on a rack.
Nutrition Information
To print recipe card without images, uncheck "instruction images" after clicking the "print recipe" button.


Jessi says
I love this recipe and plan to make it a routine! And maybe make some as gifts.
Two questions:
1. I didn't have a baking stone and just used a cookie sheet with parchment paper and flour and the pan with water underneath. ?? Is that right?
2. How do you store the bread? I'm assuming in airtight bags once it cools. ?
I think I overfloured mine a lot especially on the top. Oh well 🙂 Thanks again.
Vaishali Honawar says
Hi Jessi, you can use parchment paper on a cookie sheet-- just cut out any excess parchment because it can burn in the hot oven and give out a bad odor. And yes, I store it in airtight bags.
Thanks for the feedback! So glad you like the bread. 🙂
Jessica Chiasson Wood says
New follower to your AMAZING blog! My husband & I just made this bread and almost ate one whole loaf easy, thanks for such an amazing recipe!
Vaishali says
Hi Jessica, welcome to the blog!. So happy you liked the bread! I too find it pretty hard to stop eating that bread. Thanks for letting me know. 🙂
Banana Bread says
Your bread has an artisan feel to it, like it was baked in an Italian bakery in Genao, which strangely makes me crave soup. What Canadian looks for soup in Italy? Well, I looked for this recipe because I want to feet serious about a certain haute cuisine. Veggie Burgers. Honestly when I think about making veggie chili and corn bread, I get so bored with that idea, I think about making them. There's one problem this infamous vegan in a small trapping town in northern Manitoba is remedying. There is no vegan buns being sold at the local grocery store next door. If you read "The Book of Burger" celebrity chefs wrote three essays on three burger buns. One of them is the ciabatta bun which I pave seen being sold at a five star veggie burger cafe called Boon Burger. I'd like to replicate the shape of the ciabatta bun so I don't crave soup (or else it's back to chili which "professionally speaking" isn't a soup). How do I get that famous hand held ciabatta feel?
Vaishali says
Hi Banana Bread, If I were making rolls or buns I would scrape the dough out on a well-floured surface, cut into the desired number of buns with a pizza cutter or bench scraper, and then place them on a baking sheet and dust with flour before letting them rise. That should give you an artisan look. I don't know if I answered your question, but hope that helps.
Banana Bread says
Thanks Vaishali! You sold me on coming back to this website more often 🙂 working on the ciabatta burger buns right now actually.
riley says
i have made this bread every sunday for the past month. it has always turned out fantastic and i look forward to cutting off a piece to eat every day of the week. so simple, quick, and delicious! thanks for providing the directions for a new weekly tradition!
Vaishali says
Riley, lovely to hear that. Thanks for the feedback!
Vaishali says
Divya, you can use a wooden ladle but it will take a lot of muscle. Mix until the dough is smooth but still quite loose and then continue with the rising.
divya says
Hi Vaishali, i liked very much u recipe...just once question this bread we can prepare without stand mixture ?Can u tell me how to do?
Abby Nichols says
Hi, Vaishali!
I made this recipe tonight and it was sooooo good! I ended up cutting the recipe in half, and really wish I hadn't haha. I also substituted honey for the sugar (used about 1 tbsp). Nice, crunchy crust and chewy, spongey inside. Yum!
Anonymous says
This bread is amazing. Soooooo tasty and beautiful! Word to the wise out there though, parchment paper burns at around 451 degrees. If you have a baking stone, slip the paper out, or you will end up with burnt paper crisps on the bottom of your oven as well as a "rustic" smelling kitchen!
Anonymous says
This was my first attempt at making bread of any kind, I am now completely blown away with the simplicity of homemade breads and the exceptional taste that simply does not compare with bread brough from a store. I found this a ridiculously simple recipe, although my dough did not have the consistency of pancake batter but went straight into a doughy texture. Anyway the results were still much better than i had anticipated, for some reason my cooking never seems to be as good as the recipe however this time my bread was just as good as those in the picture, thanks so much for this wonderful recipe!
Vaishali says
Anonymous, thanks for the feedback. And congratulations on your first bread!
Vaishali says
Hi Madhu, try mixing it with a wooden ladle instead. I've made ciabatta before where at least the first portion of the recipe was mixed with a wooden spoon and it was fine. It will need some vigorous armwork. In the second step, where I suggest replacing the paddle with a dough hook, just continue to use a wooden ladle and stir vigorously for about 10 minutes. Be sure to get a strong ladle! 🙂 Good luck.
Anonymous says
Hi Vaishali,
I dont have a stand mixer but would luv to try this crusty bread, how do I make the dough by hand? any suggestions?
Thanks,
Madhu
Vaishali says
Sumi, Thanks!
Tami and Sarah, thanks for the feedback. Glad you both liked it. 🙂
Sarah says
This was excellent. Big air bubbles, crusty exterior, etc. One of my favourite bread recipes of yours!
Tami says
Thanks for the clarification and for sharing the recipe. It's wonderful. Definitely a keeper!
Sumi says
Absolutely gorgeous bread. After living in europe for some time I have become a fan of Ciabatta(freshly baked).Good work.
Vaishali says
Tami, Anonymous, the pan in the lower rack is meant for water-- I will add it to the recipe instructions. Add the water to the pan just before you place the bread in the oven. Thanks for pointing out.
Anonymous says
As another poster has asked...
"the empty pan on the bottom shelf"
Would you please edit the recipe to include the instructions for the "empty pan". Many thanks!
The bread looks fabulous ~ can't wait to make it!
Tadka Pasta says
Gorgeous bread..those holes are to die for! Love ciabatta!!
Renu says
thanks for sharing this detailed recipe with us. I love this bread 🙂
Tami says
Ciabatta is my favorite, too, and I'm making your recipe right now. If you happen to see this, I have a quick question. What is the empty pan on the bottom rack used for? Steam-- as in I should add water? Thanks for sharing your recipe!
Gayatri says
Wow Vaishali this looks so good. I love bread. In fact, my husband & friends have to keep me away from the bread basket at restaurants. Now, thanks to your recipes, I can bake my own!!
Gayatri
Anu says
looks perfect
Rashmi says
Wow, Looks so beautiful.
Vaishali says
Thanks, all! 🙂
Priya says
Wow wat a beautiful looking well baked bread..
Miri says
What a beautiful light airy bread you have baked! Gorgeous!
divya says
Wonderfully delicious looking.... . Excellent preparation.
Santosh Bangar says
yummy bread
Richa says
ooooh .. i love that airyyyyyy ciabatta.. 🙂
Richs@ Hobby And More Food Blog
Vic Robinson says
That looks amazing! So light an airy! I am drooling!