

A foolproof recipe to make your own, homemade Italian ciabatta bread in under four hours!
You might also like these recipes for Italian bread and Tuscan bread.
Ciabatta is my favorite Italian bread, but it is not always the easiest and quickest bread to make, even for a seasoned baker.
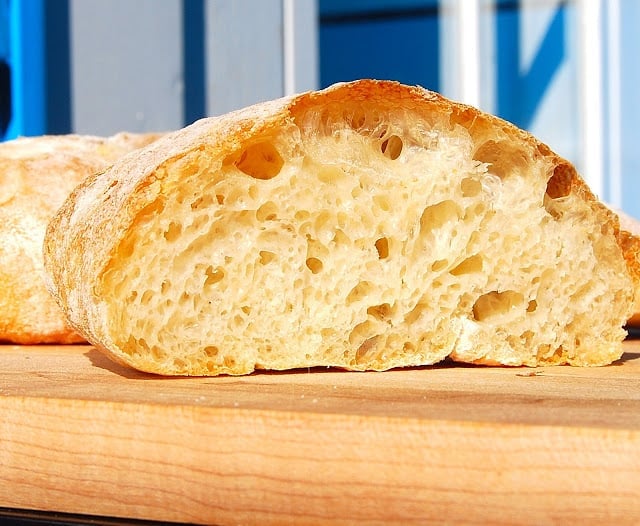
The dough is rather wet and sticky and can seem impossible to work with when you're new to the process, but that wet stickiness is also vital to the light, bubbly, airy texture of this bread.
This also is a bread that requires some planning ahead because you need to let the starter stand overnight or at least several hours. And planning ahead is not my favorite thing to do.
I was resigned to making ciabatta only when I have the time, which is not often, until I came upon a great technique that cuts down the waiting significantly.
The initial rise time for this ciabatta is under two hours, and the second rise is just about an hour. So in under four hours, including prep and baking time, you are rewarded with a fluffy, crusty, delicious bread that you won't be able to stop dunking in olive oil and popping into your mouth.
More vegan bread recipes
Recipe card
Quick Ciabatta
Ingredients
- 4 cups all-purpose flour
- 2 ¼ teaspoon active dry yeast
- 2 ¼ cups warm (not hot) water (you might need more if you are in a dryer area)
- 1 teaspoon salt
- ¼ teaspoon sugar (not usually found in traditional ciabatta, but it really helps speed the rise)
Instructions
- Mix the sugar, water and yeast in a bowl and set aside for five minutes for the yeast to start working.
- Add the flour and salt and mix in a stand mixer fitted with a paddle. You want the mixture to be just slightly thicker than a pancake batter-- it should definitely not pull together into a firm dough.
- Let the mixture stand for about 15 minutes. Then turn on the stand mixer to a medium-high setting. After about six minutes, the dough will start to make a flapping sound and start rising up the sides of the bowl.
- At this point, switch the paddle for the dough hook and knead for another six to seven minutes until the dough starts pulling cleanly off the sides of the bowl. It will be smooth at this stage but still very sticky and loose.
- Grease a bowl and pour the dough into it. Cover with a plastic wrap or kitchen towel and place in a warm spot, like an oven with the pilot light on.
- In about 1 ½ to 2 hours, the dough would have tripled.
- Prepare a cookie sheet by lining it with parchment paper and then dusting the paper liberally with flour.
- Pour the dough out of the bowl and into the center of the cookie sheet. Dust the top with flour.
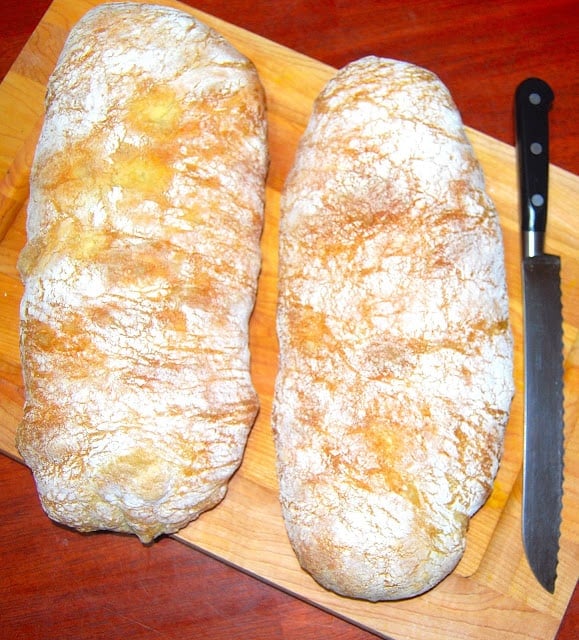
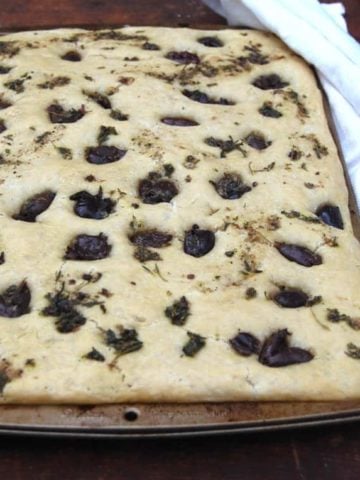
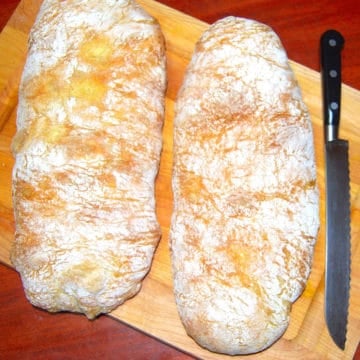
- Using a bench scraper, divide the dough into two pieces. Using the bench scraper and a wet hand if needed, shape the dough, tucking the irregular pieces underneath, until you have two flat logs. The logs should be about six inches apart. This is a rustic bread, and the wet dough is not going to hold a definite shape, so don't even try for a beautiful, even look. This is known as an Italian slipper bread for a reason. The baked bread will turn out absolutely gorgeous, trust me, with a translucent, lit-from-within look and those gorgeous air holes.
- Dust some more flour over the logs, then cover them with a loose kitchen towel and place in a warm spot for about an hour or until the logs are risen and all puffy-looking.
- About half an hour before baking, place a pizza stone or baking stone on the middle rack and preheat the oven to 500 degrees Fahrenheit. Place an empty, oven-safe pan on the bottom rack before preheating, then carefully add a cup of water to it just before you place the bread in the oven.
- Place the ciabatta loaves directly on the baking stone by sliding the parchment off your cookie sheet. If you are not confident about doing this, just place the entire baking sheet on top of the baking stone.
- Bake for 25 minutes or until the loaves are golden-brown and the bottom sounds hollow then tapped.
- Cool thoroughly on a rack.
Nutrition Information
To print recipe card without images, uncheck "instruction images" after clicking the "print recipe" button.


The Unruly Gardener says
This was my third try at a ciabatta recipe, and THIS IS THE RECIPE! Stickiest dough I have ever seen; just slid it onto the baking steel parchment and all. Definitely used the steam. Just ate two slices for my dinner, with an amazing Tuscan olive oil, a little salt and pepper, and a dry white. I thought I was in my favorite Italian restaurant!
Vaishali says
🙂 So happy to hear!
Mel says
HOLY CRAP MY BREAD TURNED OUT AMAZING. Airy, chewy inside, crispy perfect outside. Thanks for this recipe. You have changed my bread life.
Val says
Exactly by the book. I left my dough overnight in cool place. Trippled by morning , produced two loaves weighing 425g each. On parchment and in oven now. I'm thrilled with the ease of the recipe!
Vaishali says
So happy to hear, Val!
Anonymous says
Amazing recipe!!
Karen Manning says
At what stage can the dough be frozen?
Vaishali says
After the first rise, usually, for any bread dough.
Jay says
Came out gorgeous -- so moist and tender and airy inside with that perfectly crisp crust. I don't have a stand mixer, and I managed to do it with a Danish dough whisk -- it was a bit of a workout, but SO worth it.
Sarah says
I bake a lot of bread and this is one of my favorites. Thank for this recipe, it surely saved me some time.
Rina says
I don’t have a pizza stone. Can I bake it while still on the cookie sheet?
Anonymous says
Absolutely.and leave it on parchment paper
Brittany says
How do you store this bread?
Joanna says
I can only find instant yeast. Can that be used the same way instead of the active dry yeast? Thank you.
Melissa says
I only buy/use instant yeast! First rise 30 minutes 2nd rise 45 minutes is perfect for this bread! Always double check bread recipes if they use regular yeast and you have instant you must cut the rise time they give in half! If you do the longer rises using "instant yeast" you could blow the yeast out and have flat bread! I only use instant bc I don't have the patience for hours and hours of rising lol
Hayden says
This is the first time I’ve ever made ciabatta bread, and it was perfect! Followed the recipe exactly. I don’t think I’ll ever buy it from the store again. Thanks so much!
Aneliza says
I made this today and I loved the outcome! I shared pics on my social media and everyone's asking for the recipe. I'll be sharing this one for sure!! Thanks for posting.
Vaishali says
Aneliza, that's great to hear. So happy you loved it!
Elyse says
Looking to make this bread. What could I substitute for the yeast?
Sena Crutchley says
I can't believe that I bought ciabatta bread for years! This was such an easy recipe with so few ingredients. It was so exciting to see it turn out as you described every step of the way. The final product has those lovely air spaces like the ciabatta I used to buy. We had beet burgers on ciabatta bread for supper tonight, and I'm in heaven.
Amber says
I made this last night and it came out perfect!! So excited to share this with others!
corinne says
I made this late at night and i kinda overdid some things but it turned out great! it makes a great crackling sound and even though its my first try, it was actually amazing!!
Sarah says
Hi, this recipe looks beautiful and I'm going to bake tomorrow morning. Can I freeze this bread? And if so what type of wrap to freeze it in? Thank you.
Vaishali says
Wrap it tightly in cling wrap and freeze!
Jodean says
What if I don't have a pizza stone?
Vaishali says
Use a baking sheet. Or if you can, get some unglazed tiles from the hardware store-- they are quite inexpensive.
jesse says
I just wanted to say, i made the bread and it was great, but wanted to warn everyone after what I did. I was not thinking and used a Pyrex glass baking dish for the pan underneath and after heating it to 500 degrees when i poured the water in it exploded. Please nobody repeat my mistake, it was dangerous, and scared the crap out of everyone in the kitchen and made a huge mess that took an hour to clean. After doing that i baked the first loaf with no water and it turned too brown, the second one i turned the heat to 450 and put a cast iron pan half full of water underneath and it turned out great.
Anonymous says
I did the same thing! Glass everywhere!!
JUSTINE says
CAN YOU USE FAST-ACTING YEAST ? IF SO HOW WOULD THAT ALTER THIS RECIPE?
Cammie Hauser says
Just out of the oven!!! Oh my goodness!! A little crunchy on the outside and spongey holes on the inside!! I sprinkled a tiny smidge of pink Himalayan sea salt, fresh Parmesan and some dried oregano on the outside (I know, I know) and my family thinks I’ve hung the moon!!!!! My kitchen smells like heaven!
Sally M says
Brilliant, I've tried 3 different ciabatta recipes but this has been the best so far. Great crispy crust and it rose beautifully 🙂 thank you for sharing this!
Anonymous says
Do you mind post the recepee again please
Vaishali says
I posted it already -- you might need to clear your browser cache.
Anonymous says
Please can anyone give me the recepee again for some reason it is here anymore
Vaishali says
Thanks for the heads up. I have restored it.
Lana says
Wow...just want to say thanks for this recipe. Have tried the bread before and it flopped..but this recipe...perfect. Only thing it was a bit flat so will work on it. But perfect in texture and taste!!!
Marcy says
I made this tonight. I have to say I am quite amazed at the results of this recipe! FOR SURE will be making this again and again. New family favorite here. The speed of this makes it an easy winning recipe for this household. I will have to adjust to my oven temps and stones because they got a little more done than I'd like and was a bit distracted. All in all I can't thank you enough for sharing this gem!
Vaishali Honawar says
Hi Marcy, so glad you liked it. Thanks for letting me know!
Marcy says
Vaishali,
I continue to get much better with this recipe. I put ice cubes in a straining pan over my hot pan. So much amazing outside texture. My kids now feel bread is so not scary to bake. I started each kid with this recipe. My daughters and son all bake extremely well and feel confident with breads. This is a great recipe to boost confidence-including mine!!
Vaishali says
Hi Marcy, how heartwarming it is to hear that! Thank you for sharing that. And this makes me think I need to start teaching Jay how to bake bread.
Eddie says
I am jazzed to find this recipe.
When I made ciabatta similar to this in the past I would add *boiling* water to the already heated metal pan. The flash of steam keeps the crust pliable for the oven spring.
Also, using a full size thick rectangular pizza stone, the preheat time was a full hour at 500F.
Lastly, the oven temperature was turned down to say 400 F or 425 F after 5 minutes of baking, and used judgment on cooking time, rarely as long as 25 minutes, closer to 20 for me.
hannah borrett says
Not sure if mine was to wet and did triple rise in the bowl but when i turned it out and left it to rise for an hour it stayed flat and didnt really rise much during the cooking either
vichy says
Hi Vaishali,
Please could you let me know which brand of flour you used. I used Robin Hood All purpose . I hear that KAF is very good and Costco's bread flour can be used with great results as well.
vichy says
HI Vaishali,
You just nailed it. I saw the holes and swooned. What a sight for a food junkie. I did try the bread immediately. Got a great crust and good chew for the minimal effort I took. Made only one loaf ! Shame on me. I kneaded away like a trooper using my hands( for 6 min) One can knead no more as it is already moist, so can just fold it onto itself with the bench scrapper - I did an initial mixing in the food processor. Bad idea .... as the wet dough just twirled itself all around the blade and gave me a workout later to scrub it all away. The initial rise took 2 hours and rose almost double ( in spite of the instant yeast stored in the fridge) . In the second rise,it just rose ever so slightly even in the 45 min period. I kept the good old pan with water for steam on the last rack and threw in many ice cubes on the sealed floor of my Jenn- Air oven. The crust color was good as well.
I did encounter one problem, Holes, yah some .. but not as many as your lovely bread. I know that with better flour I can conquer that one. One prob I always face is there is no upward rise to my Ciabatta. No height at all 🙁 What can I do to get it to rise higher in order to make decent sandwitches. Sorry for the lengthy note. I wanted to give you a detailed explanation so that you can get a clearer pic. Please let me know what to do.
Vichy
Vaishali Honawar says
Hi Vichy, the rise problem happens with me too, with some ciabatta breads. I think it's a question of getting the dough to the right consistency-- not too loose, not to dry -- and also ensuring that the oven is really, really hot. The dough part may just take a lot of practice.
Another way to do it might be to "cheat" and use a loaf pan which will support the bread when it rises. You won't have an authentic look, but you'll be able to make sandwiches.
So glad you tried the recipe-- and thanks for your feedback! 🙂