

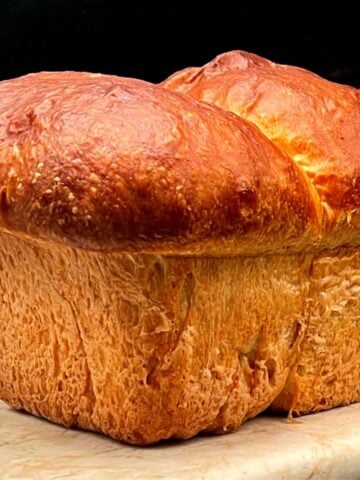
This whole wheat baguette recipe is healthier because it uses all whole wheat flour, but it tastes just as good as any French bread you might buy at the bakery. You need four pantry ingredients and it's ready from scratch in about four hours.

Foolproof whole wheat French bread recipe
Years ago, I indulged our shared love for baking and eating bread with a healthier French bread recipe made with a 3:2 mix of whole wheat flour and all-purpose flour. That recipe has lived on the blog since 2009, but I've since tweaked it to make this bread with only whole wheat flour. Now, I give you this nutritionally improved, 100 percent wholegrain but still delicious, light and airy whole wheat French bread!
French bread is one of the easiest breads to bake, and almost anyone can make a pretty decent loaf with a little practice. Most classic French breads, like my easy French bread, need only two or three pantry-friendly ingredients. This whole wheat French bread is almost as easy, but it does require one more ingredient - vital wheat gluten - and slightly longer rise times.
The vital wheat gluten gives the wholegrain dough a helping hand by making up for the reduced gluten in whole wheat flour. If that's confusing, let me break it down a bit for you:
- Refined flours like all purpose flour and bread flour are made by milling only the endosperm or the starchy interior of the wheat kernel after it has been stripped of its outer coating, called the bran, and the seed embryo, called the germ. The endosperm is the part of the kernel that contains two key proteins that form gluten.
- Whole wheat flour is made by milling the whole wheat kernel. So it includes the protein-rich endosperm but it also includes the bran and the germ. The bran and the germ don't contain proteins - instead they are rich in fiber and vitamins. As a result whole wheat flour is better for you than refined flour but it isn't so great for baking because measure for measure it has less gluten-forming proteins than all-purpose flour does.
Gluten is critical in baking bread because it gives the dough lift and structure. By adding vital wheat gluten - a concentrated wheat protein made by removing all starch from wheat flour - to this recipe, we can ensure our French bread will have great structure and texture.
The wholegrain dough will also take a little longer to rise than a white flour bread dough would. I factor in about an hour and a half for the first rise and another hour for the second. If you add in 30 minutes of baking time, you can still have a delicious loaf of French bread - one your family will love and one you know is good for them - on the table in under four hours.
If you love baking bread, you might also enjoy these recipes for sourdough French bread and French-style crusty Mexican rolls, bolillos. You can also browse many more made-from-scratch bread recipes in my collection of all the bread recipes you'll need.
Recipe card

Whole Wheat French Bread (Baguette)
Ingredients
- 1 cup lukewarm water
- 2 ¼ teaspoon yeast
- 1 teaspoon sugar
- 2½ cups whole-wheat flour
- 1 tablespoon vital wheat gluten
- ¾ teaspoon salt (tweak salt according to taste)
Instructions
Make the dough
- Mix the water, yeast and sugar in a large bowl. Let stand for a few minutes until the mixture becomes quite bubbly, about 5-10 minutes.

- Add the flour, vital wheat gluten and salt to the yeast.

- Mix to combine and then knead by hand about 10 minutes or in a stand mixer set to medium speed for eight minutes until you have a very smooth, elastic dough.

First proof
- Form the dough into a ball and place in an oiled bowl, turning over once to coat the top with oil. Cover with a lid or cling wrap and set aside to rise in a warm spot, like a cold oven with the light turned on, for 1½ to 2 hours.

- After this first proof, the dough should have doubled. Turn it over so the smooth top is down, then use your fist to deflate the dough and punch it into a circle, about 8-10 inches in diameter.

Form the baguette
- Begin rolling the dough, pressing in the seams thoroughly with your knuckles or the heel of your hand, until you have a long cylinder.

- Roll the cylinder of dough, using your palms to taper the ends, to get a baguette shaped loaf that's about 12 inches long.

Second proof
- Place the loaf on an unoiled baking sheet, seam side down. Cover loosely with a kitchen towel and set aside in a warm spot for an hour or until the loaf is puffy and has doubled in size.

Score and bake
- Preheat the oven to 450 degrees Fahrenheit/232 degrees Celsius. Place a baking pan with water on the lowest rack and position another rack in the center of the oven.
- Use a sharp knife or bread lame to make three long, diagonal cuts in the top of the risen loaf.

- Place the French bread loaf in the oven and immediately reduce heat to 425 degrees Fahrenheit/220 degrees Celsius. Bake 30 minutes until loaf is golden brown. Let the bread cool thoroughly on a wire rack before cutting into slices.
Nutrition Information
To print recipe card without images, uncheck "instruction images" after clicking the "print recipe" button.

Whole wheat French baguette FAQs
Yes, you absolutely can double all ingredients in this recipe to make two loaves, except the yeast. Increase yeast by ¼ teaspoon for a total of 2 ½ teaspoons.
You can, but you might need to give the dough more time to proof and the loaf won't be as airy. If you can't use vital wheat gluten, substitute a cup of the whole wheat flour with bread flour or all-purpose flour.
This whole wheat French baguette stores beautifully. You can refrigerate it after making for up to a week. You can also freeze it, tightly wrapped in freezer-safe wrap, for up to six months. Reheat refrigerated and frozen bread in a 350 degrees F/180 degrees C oven until warmed through and fresh again.
First published on Sep. 1, 2009. Updated and re-published on Jan. 9, 2026.


Joshua says
I can't believe how easy it was to make this. It came out perfect on my first try. The recipe really has everything in perfect proportions. The pictures were also very helpful for someone like me who doesn't do much baking. Thanks.
Vaishali says
Kevin, it's the slow stuff and is labeled "active dry yeast."
Kevin says
Just a quick question. What type of yeast do you use for this? The quick stuff or the slow stuff?
Vaishali says
Vini, sorry I missed your question earlier and hope it's not too late. I am not sure I understand what you're asking. Can you please email me at vaishalihonawar@gmail.com and I'll try and clarify this for you?
Vaishali says
Anonymous, glad you liked the bread, and thanks for the feedback.
About the shortbread, here are a couple of tips: you might have needed some more time in the oven-- individual ovens heat differently, even when you set them to the same temperature, so you might want to give your shortbread a little more time in the oven the next time.
Also, you do have to wait until the shortbread cools thoroughly before you cut into it, or it will crumble easily.
Hope that helps 🙂 Feel free to ask if you have other questions.
Anonymous says
I just made this bread tonight (with a few alterations to fit my needs) and my entire family thought it was good! Even my sister, who hates most everything I make because it is vegan, said that it was very good. Thank you for a bread recipe that finally brought my family to my side!
I also tried the lemon shortbread, but it came out super crumbly and wouldn't hold it's shape very well. I was so dissapointed. I don't know, maybe I did something wrong?
Anonymous says
Hi Vaishali
Tried this bread yesterday with White Whole Wheat Flour. Enjoying it with spicy curry made of Green Moong and Masoor (Mix Usal)
Thank you
Mihl says
What a nice colour that bread has!
Shri says
Love the step by step pics Vaishali!I am still an amateur in bread baking...Will try this recipe of yours
Stephanie says
Hi, I made another of your recipes for my family and we all loved it! I just made some French bread...I will try this whole wheat version next time, for sure!!
Thanks!
Peace, Stephanie
Anonymous says
It is really simple. Will try it soon.
Thank you
Uj says
Bread looks beautiful and perfect.I hope to learn to make bread sometime
Parita says
Grt step by step instructions vaishali, would love to make this sometime soon 🙂
Madhavi says
WOW awesome bread, will try soon!!
The Voracious Vegan says
WOW! This was such a great post, I learned so much. Your photography is stunning and I am seriously impressed with the quality of that bread - it looks fluffy and chewy and just perfect.
Usha says
Beautiful bread Vaishali and great step by step pictorial ! Now I have no reason to put off trying french bread which has been on my to do list for so long .....:-)